Restaking doesn't generate any rewards right now since the launch of Actively Validated Services (AVS) generating these rewards is planned for a later stage.
However, EigenLayer highlights that restaking early provides the earliest possible access to AVS rewards, as some services may cap their initial restake amounts.
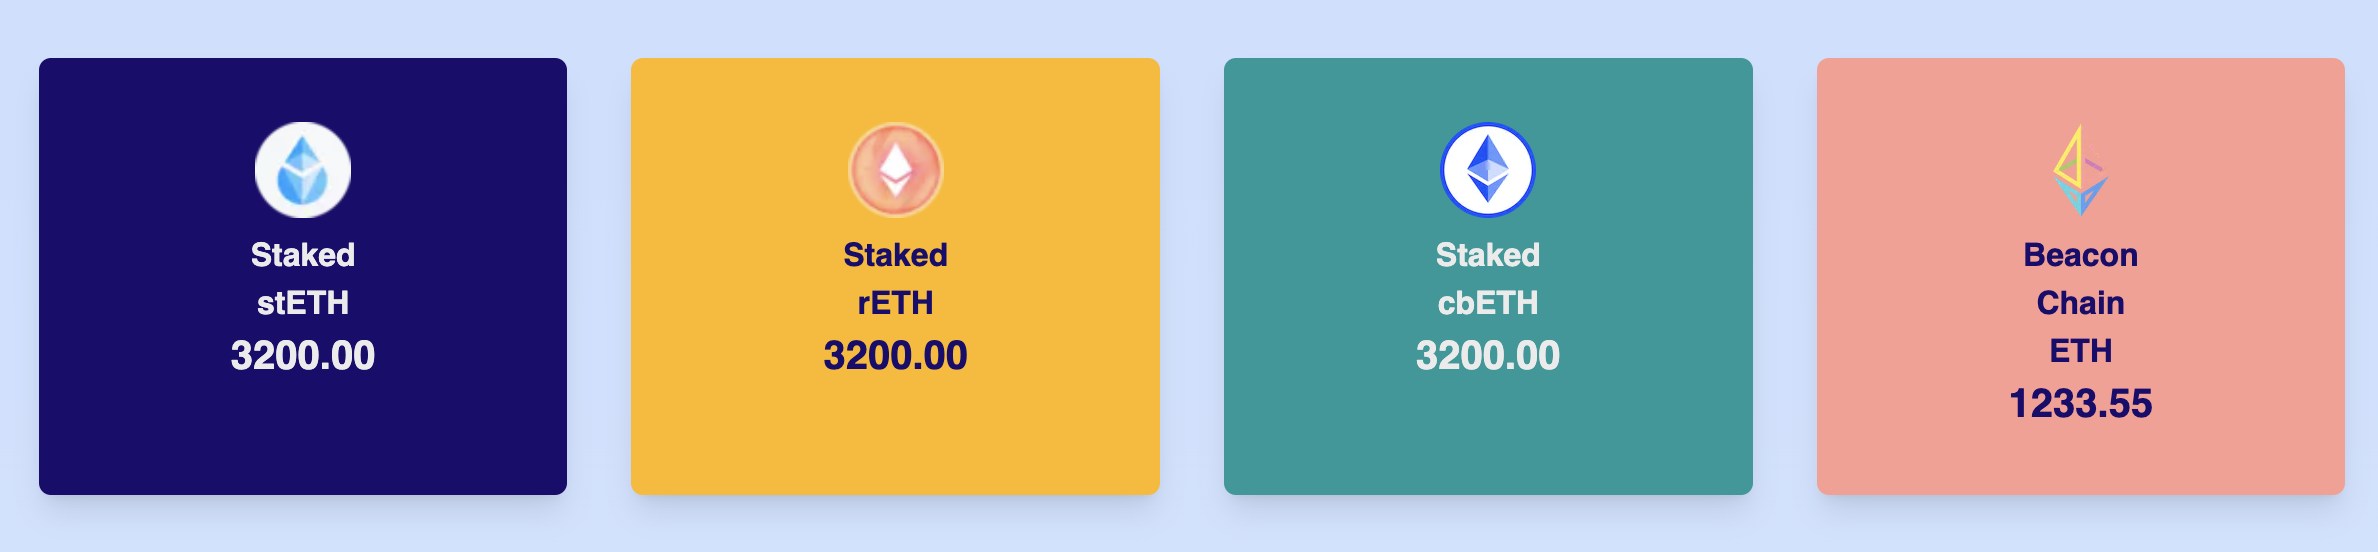
EigenLayer was launched with initial usage limits of 3200 for stETH, rETH, cbETH, and 9600 ETH for native staking. The stETH cap of 3200 ETH was reached within the first hour, with rETH and cbETH following shortly afterward! The team promises to increase limits progressively over the coming weeks and months.
Although all liquid staking token (LST) options have already reached their caps, native stakers still have time to become a part of early adopters.
Restaking with P2P.org
You can restake your ETH on the EigenLayer network using the P2P.org staking dApp. Our dApp, which is non-custodial, supports the option to customize validator withdrawal addresses—a fundamental necessity for directly restaking to an EigenPod. Suppose you don't already have an EigenPod address. In that case, we are excited to announce a new feature where users can generate their own EigenPod address directly within the staking process in our dApp!
Below, we have prepared a step-by-step guide on how to do this. However, before restaking, please take note:
⚠️
The withdrawal address is used to get your ETH deposit back. It's specified once, and nobody can change it after the staking deposit is sent because the network cements the association of a particular validator and withdrawal address. When you decide to put your EigenPod Address as a withdrawal address, you accept EigenLayer smart contract risk and understand that P2P.org can't change this address.
How to restake if you don't already have an Eigenpod address:
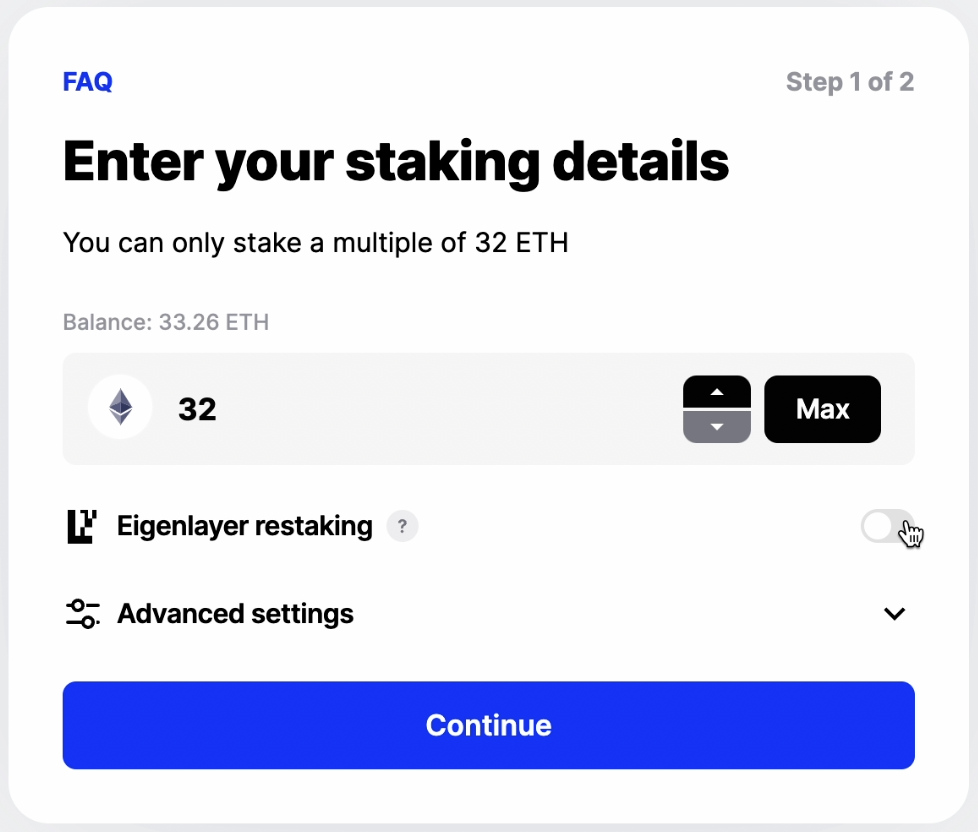
1. First, visit our Ethereum staking dApp at eth.p2p.org and connect a Web3 wallet.
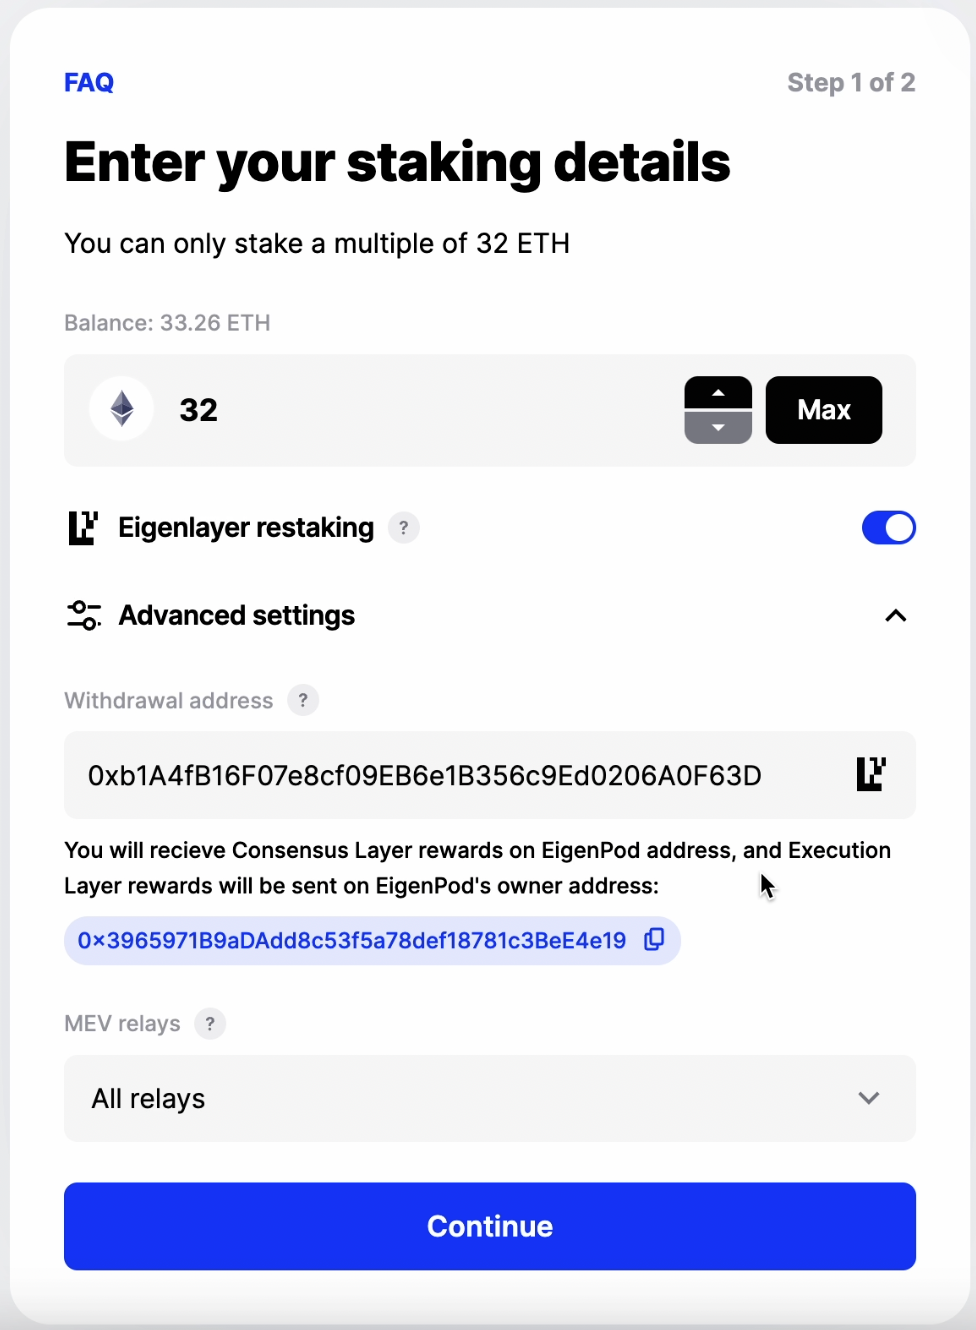
2. After connecting to the Web3 wallet, enter in the field the amount of ETH you want to stake, for example, 32 ETH. Under the field, you will see option Eigenlayer restaking with the checkbox:
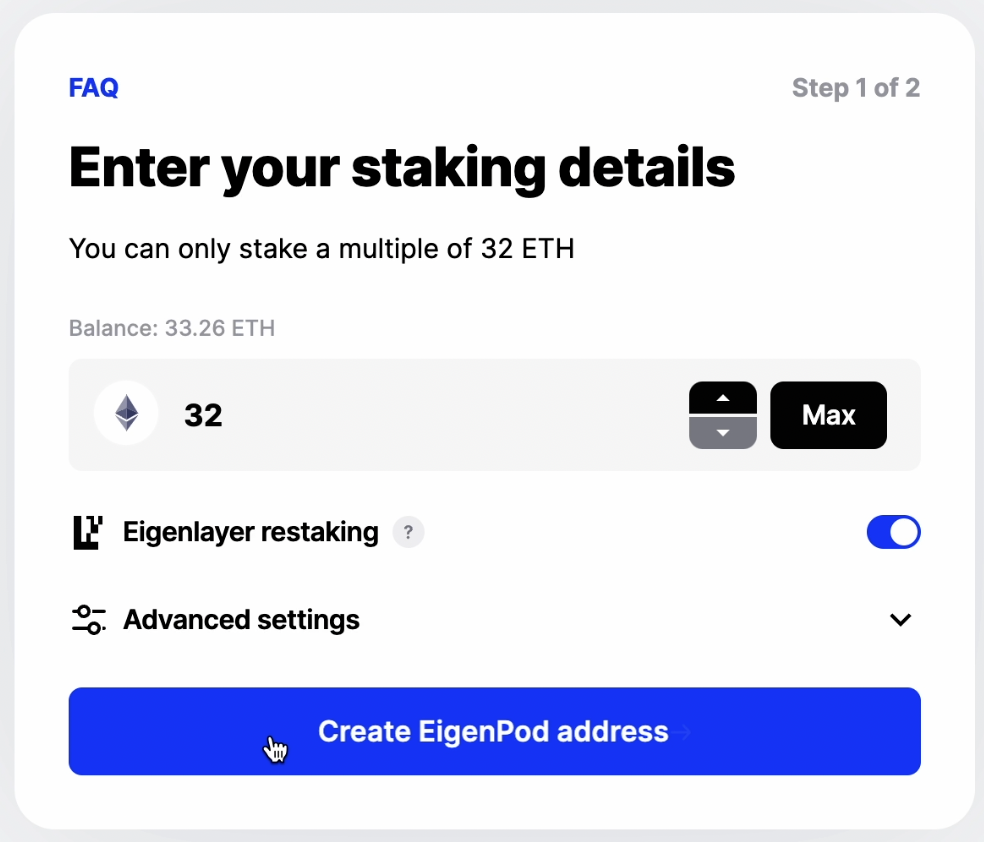
3. Activate the checkbox (blue = activated). After you activate the checkbox, note that the button "Continue" below the screen switched to "Create Eigenpod address":
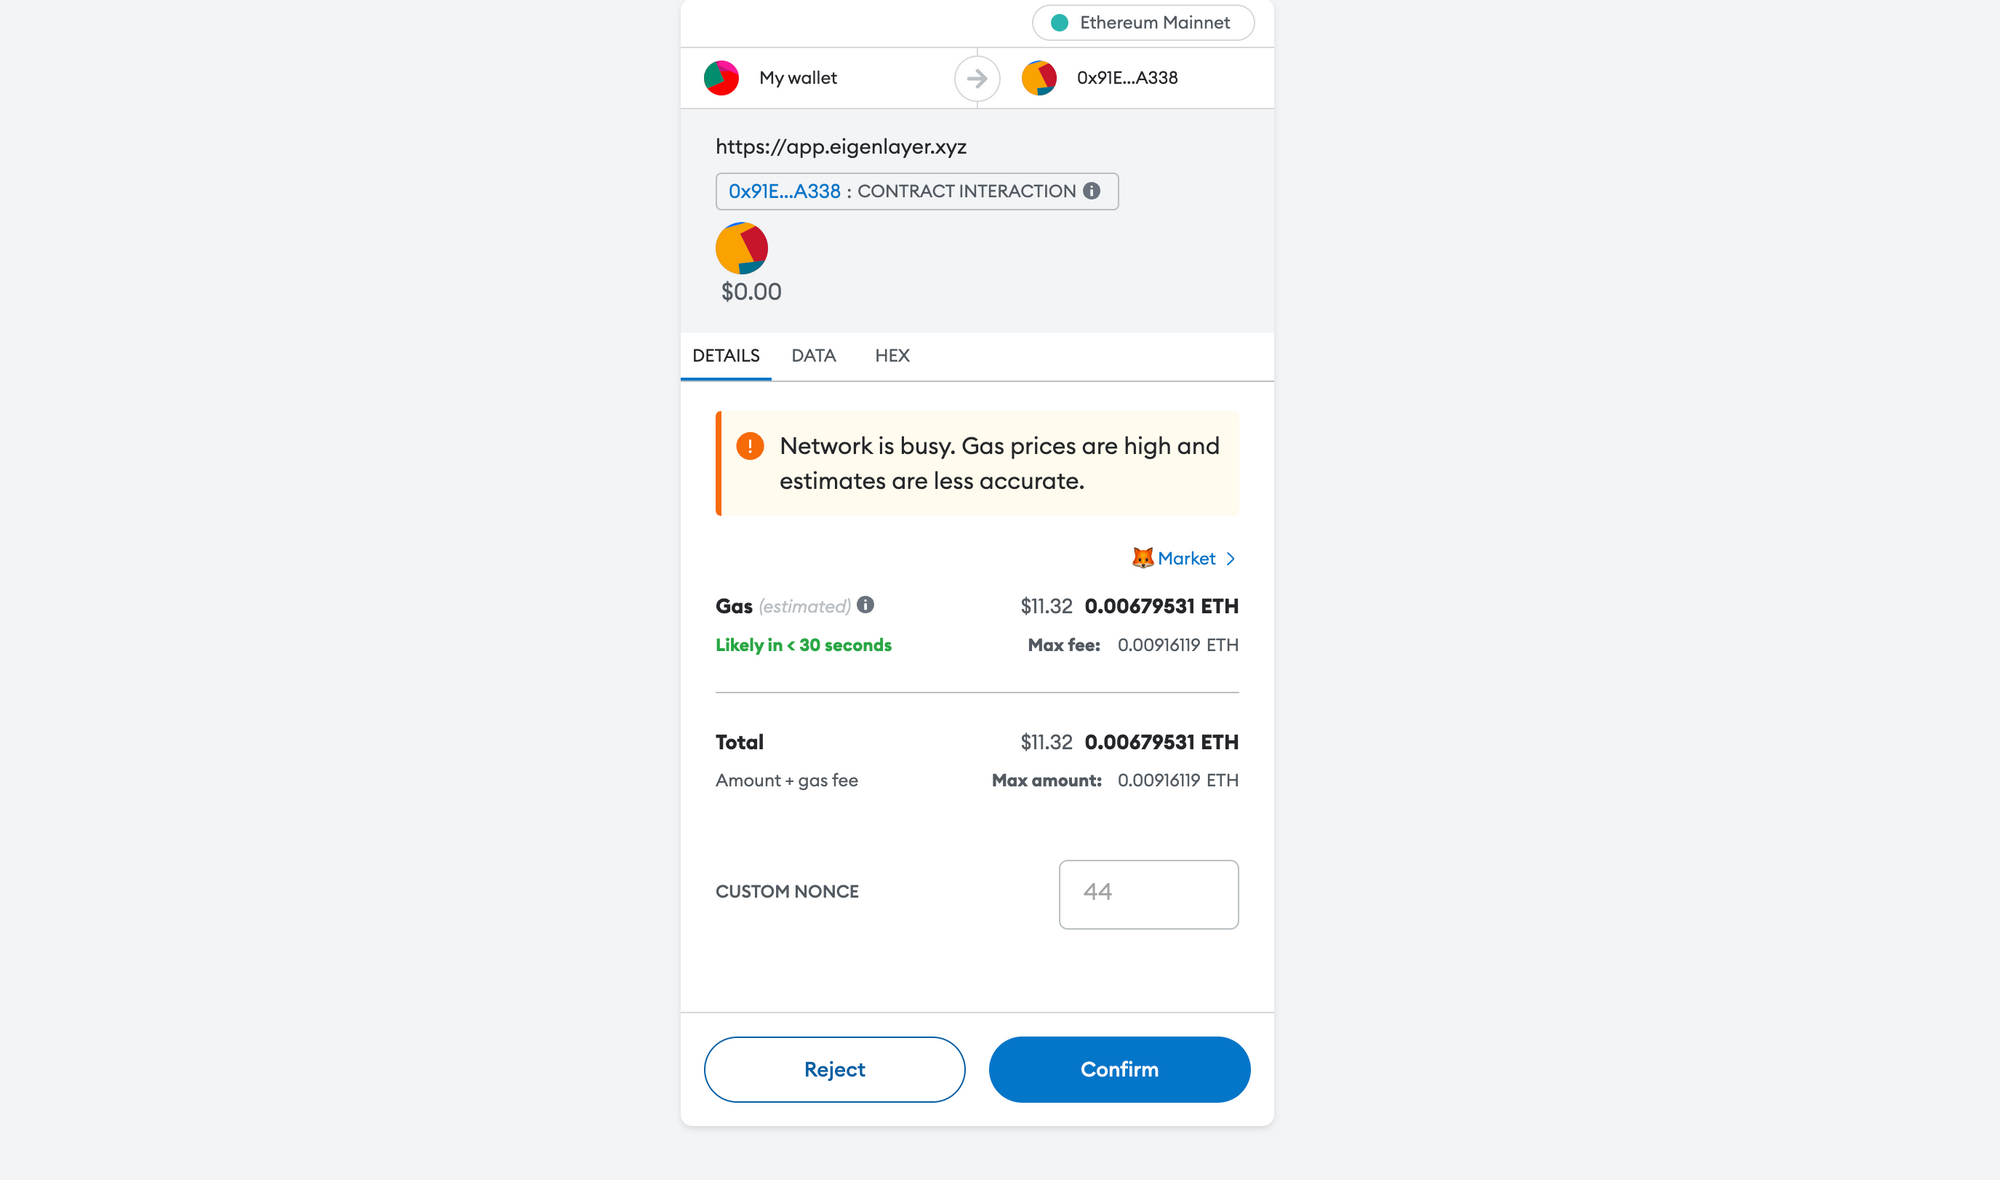
4. Now, we need to create an Eigenpod address by pressing the following button. The creation of an Eigenpod address happens by calling the Eigenlayer smart contract. As the user requests the calling of a smart contract in the Ethereum network, you must pay Gas for the Eigenpod transaction and sign it in your wallet.
5. After the user has signed the transaction, the Eigenpod address will be created, and its withdrawal credentials will be automatically filled in the 'Withdrawal address' field in 'Advanced settings.' Pressing the Continue button to continue the process:
⚠️
Based on the Eigenlayer system design, you will receive CL rewards on the created EigenPod address, while your EL rewards will be sent to Eigenpod’s owner address (the wallet you used to create Eigenpod). Since you are using our flow, your Eigenpod owner’s address is the one you are connected to our dApp during this staking process.
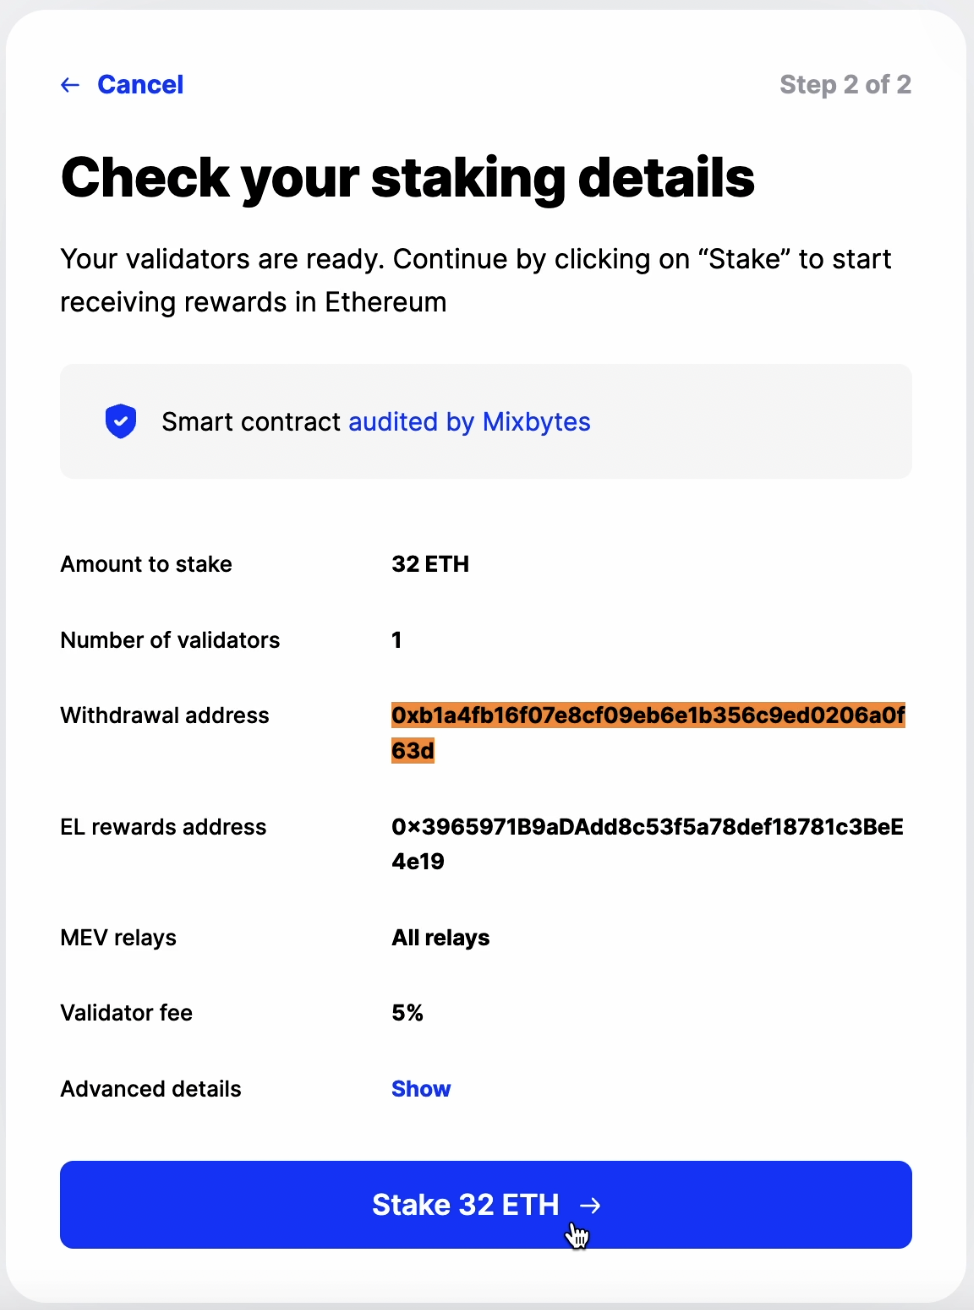
6. The system will start the staking process and will show you the final staking details. Review details, and press the 'Stake' button.
7. The dApp will ask you to sign the transaction with your Web3 wallet. After signing and the transaction pending, the system will confirm that your stake is done successfully!
Watch a video tutorial here:
How to restake with a new or existing EigenPod address:
To restake, you first need to set up an EigenPod address that will be connected to your wallet. This EigenPod address will be the withdrawal address in the P2P.org staking dApp. To do this:
2. Click "Create EigenPod" and confirm this transaction in your wallet:
3. A confirmation message will confirm your EigenPod was created successfully:
4. Click "Pod Details" and copy your EignePod address:
5. Visit eth.p2p.org to complete the next step in the process: Staking your ETH to an Ethereum validator. This step takes around two minutes and does not require registration or completing KYC. The below image shows how to complete this simple process: You need to turn on the checkbox Eigenlayer restaking and set your EigenPod address as the validator Withdrawal address in Advanced settings:
🔒
P2P.org's unique feature enables MEV rewards for stakers with an EigenPod address. What's crucial is that, by default, EigenPod does not accept MEV rewards. Check the next paragraph for further details.Validators propose new blocks and receive rewards, which include MEV, to their execution rewards address. Technically, the withdrawal address and the execution rewards address can be different. However, to simplify the staking process, most operators set the withdrawal address as the execution rewards address by default. However, this poses an issue for restaking: EigenPod doesn't accept direct transactions from MEV bots, which means it can't receive most MEV rewards either.We resolve this issue by automatically checking if you have put EigenPod as your withdrawal address. In such cases, we extract your EigenPod owner's wallet and use it as the execution rewards recipient address. This ensures that your MEV rewards are completely secure.
6. After staking completion, your validators will enter the validator entry queue, and by the time you're live, your EigenPod balance, will immediately reflect the stake. You can check the current activation time in our Ethereum queue dashboard.
Rewards and how they are distributed are still a work in progress. The Eigen Layer team plans to share more details in 2024Q2. For now, extra rewards are distributed by Eigenlayer in Restaking points. Restaking points measure your contribution to the shared security of the EigenLayer ecosystem, the temporary proof of your participation in the EigenLayer network. You will receive Restaking points in your Eigenpod during the restaking process.
How many Restaking points will I get for restaking?
Restaking, while offering additional rewards, also brings with it inherent risks. Validators participating in restaking face potential penalties from Ethereum and EigenLayer if they violate network consensus rules.
Moreover, validators' withdrawal credentials are tied to EigenLayer's upgradeable Eigenpod smart contracts, introducing further elements of complexity and risk.
There is no slashing until the protocol upgrade in the second half of 2024, giving new protocols and operators enough time to develop a robust risk mitigation framework.
In the future, validators participating in restaking face potential penalties from Ethereum and EigenLayer if they violate network consensus rules. So operators should carefully setup infrastructure and choose AVSes to run. Regarding native vs. LST, native restaking is a much safer option than restaking LST tokens, since your withdrawal credentials are associated with smart contracts under your management.
How Eigenlayer addresses restaking risks?
Smart contracts are audited, and a $2 million bug bounty program has been initiated since December 2023, underscoring its commitment to ongoing security enhancements.
There is a community multisig (P2P.org is one of 13 members). In extraordinary circumstances, the Community Multisig can perform emergency actions, including immediately executing time-critical upgrades or replacing the Operations Multisig in the event of private key compromise. https://docs.eigenlayer.xyz/eigenlayer/security/multisig-governance
There is no slashing until the protocol upgrade in the second half of 2024, giving new protocols and operators enough time to develop a robust risk mitigation framework.
Regarding unintentional slashing due to protocol/AVS mistakes, EigenLayer establishes a "slashing council." This council will oversee and adjudicate any slashing incidents, ensuring fairness and accuracy in administering penalties while the slashing mechanism evolves. The slashing event doesn't burn ETH; it only freezes it on the EigenPod address. This freeze can be removed by slashing the council. That will secure early restakers from slashing losses due to AVS/protocol mistakes.
How to exit from Eigenlayer?
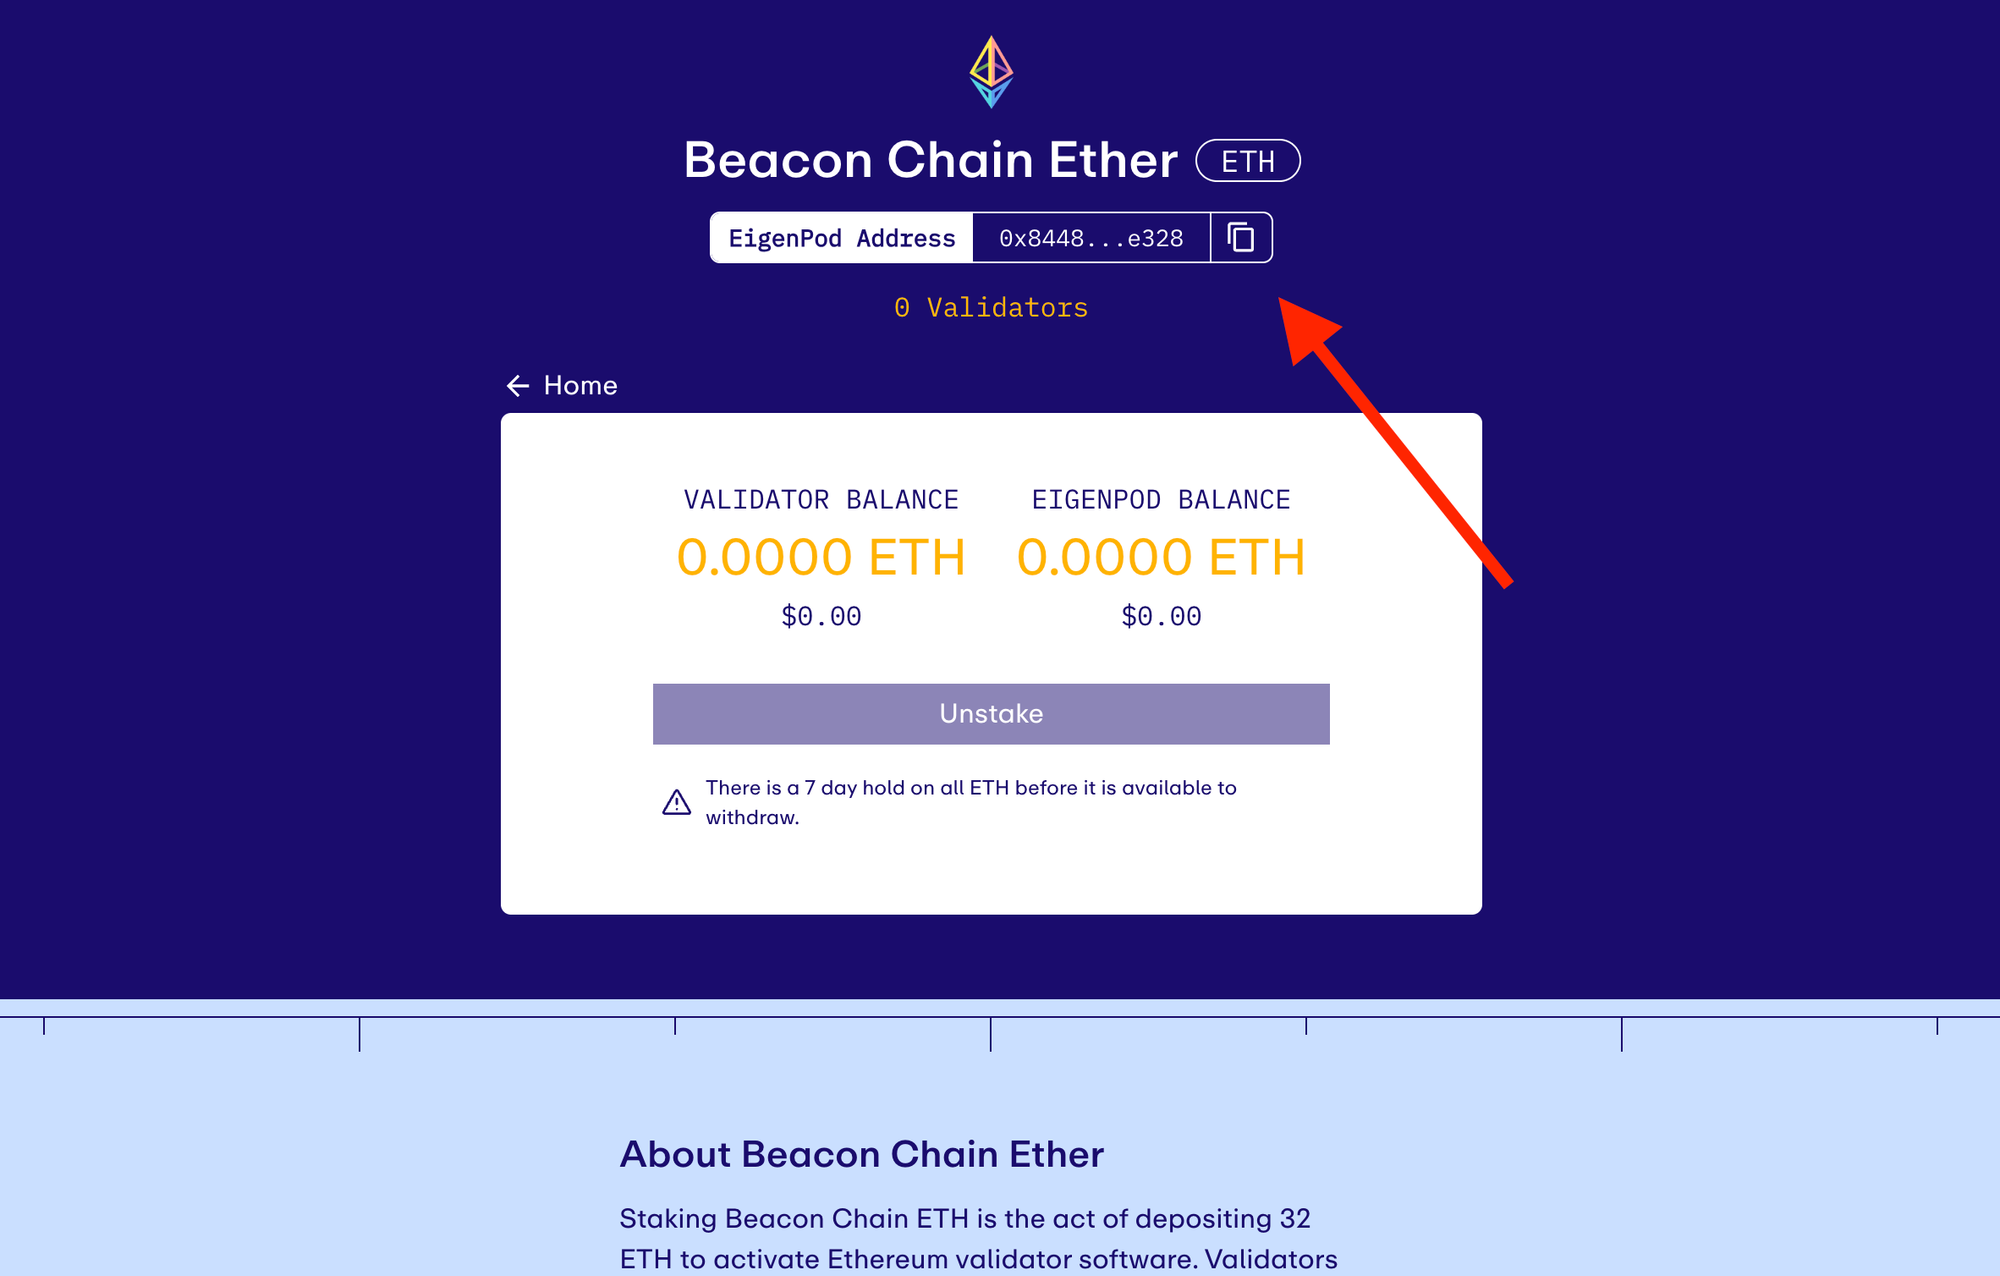
After validators are exited from the Ethereum network, your ETH transfers to the EigenPod address, and after a 7-day lock period, you can withdraw them from EigenPod.
Contact Us:
Do not hesitate to ask questions in our Telegram chat We are always open for communication.
We encourage you to check our website and start our staking journey together!
<p>A virtual machine functions like a physical computer, allowing applications and operating systems to be run on it. The largest smart contract development platform, the Ethereum Virtual Machine (EVM), utilizes the computational power of a network of nodes distributed worldwide.<br></p><p>The Ethereum network is by far the biggest and most popular smart contract network, so there is immense utility in developing EVM-compatible applications. By creating an EVM-compatible blockchain, a lot of developer attention can be captured, allowing some of these dApps to be ported over from the Ethereum network.<br></p><p>Neon EVM is an Ethereum virtual machine on Solana, developed by Neon Labs, that allows Ethereum-based smart contracts and dApps to take advantage of Solana native functionalities. <br></p><p><strong>Neon EVM</strong><br></p><p>The Ethereum virtual machine (EVM) does not exist as a tangible machine but as an entity maintained by all the nodes running the Ethereum client. More than a decentralized ledger typically used to define blockchains, the EVM defines the rules by which changes happen from block to block. In essence, the EVM functions as a decentralized computer which allows smart contracts to exist on the Ethereum Network. From DeFI to games and other dApps in the ecosystem, the EVM allows these to function.<br></p><p>While Ethereum bolsters the biggest on-chain economy of any blockchain, gas fees and transaction speeds can be counterproductive to the development of its ecosystem. In comparison, Solana allows users to transact at low cost and at faster rates thanks to its ability to process transactions in parallel. A highly optimized EVM chain can process up to 1,500 transactions per second (TPS), whilst Solana can reach upwards of 50,000 TPS.</p><p>One of the challenges when developing a blockchain ecosystem is attracting developers to work on it. The difference in programming languages and developing tools used by both chains makes porting popular Ethereum-based applications to the Solana network a difficult task. By making Solana EVM compatible, Ethereum developers can make use of their already existing code base and expertise on the Solana network.<br></p><p><strong>How does Neon EVM work?</strong><br></p><p>Neon EVM is an on-chain solution that works by wrapping Ethereum-like transactions into Solana transactions and then sending them to the Solana network. One of Ethereum's limiting factors is how transactions are processed. Solidity smart contracts need to be executed sequentially so that only one contract at a time can modify the blockchain state.</p><p>In contrast, Solana allows for parallel execution of transactions through a functionality called Sealevel, which uses as many cores as are available to the validator. Because Solana transactions describe all the states a transaction will read or write during its execution, they can be processed in parallel, thus avoiding unwanted overlaps.<br></p><p>Neon EVM enables any Ethereum native application to run on Solana without requiring any changes to its codebase. Developers can continue to write smart contracts in Solidity, and users can continue to use MetaMask. Anyone using Neon EVM can port over Ethereum transactions to Solana. This approach allows popular applications such as Uniswap, Curve and MakerDAO to be built natively on Solana with much less friction and resources. This reduces development requirements and time savings while granting access to Solana's large liquidity. <br></p><p><strong>What are Neon EVM key features?</strong><br></p><ul><li>For each Solana token, an <strong>ERC20 SPL-Wrapper</strong> contract can be deployed and Ethereum wallets such as Metamask can be used to transfer funds in Solana tokens.</li><li>The <strong>ERC20 SPL-Bridge</strong> can generate a Solana token representing the corresponding ERC20 token in the SPL-token contract.</li><li>Neon EVM operators can be paid in an ERC-20 token designated by the user for completing transactions, which adds an extra layer of flexibility.</li><li>Gas consumption is done according to Ethereum rules.</li><li>Neon EVM keeps track of any hard forks and upgrades on Ethereum and Solana. This is a crucial aspect since any potential changes to the network codebase could be disruptive.<br></li></ul><p><strong>Neon Web3 Proxy</strong><br></p><p>Neon EVM Proxy operators are key players in the Neon EVM ecosystem. They run special servers, known as Neon Proxies, that enable Ethereum-based applications (dApps) to function seamlessly on the Solana network with minimal reconfiguration. The primary task of a proxy operator is to set up and manage these Neon Proxy servers. They provide an interface that accepts transactions formed according to Ethereum rules, transform Ethereum-like transactions into a series of Solana transactions, and ensures these transactions are successfully executed on the Solana network, enabling dApps to benefit from the speed and efficiency of the Solana network.<br></p><p>Neon EVM proxy operators are crucial in enabling Ethereum-based applications to run smoothly on Solana's network. As they manage Neon Proxy servers, they incur transaction costs on Solana, paid in lamports, for executing the Solana portion of Neon EVM users' transactions. To compensate for these costs, Neon EVM automatically retrieves an equivalent amount of ERC-20 tokens from the users plus a small additional fee, which is shared between the operators and the Neon treasury. Initially, users will only pay these fees in Neon tokens, but as per the project roadmap, they will eventually be able to choose from any supported ERC-20 tokens. While these fees are minimal from a user's perspective, they can accumulate to a significant sum for proxy operators, depending on the number of Neon EVM users and their activity level. Therefore, this fee structure covers the operational costs of the proxy operators and serves as a revenue stream for the Neon proxy operators and the Neon DAO treasury, making it a pivotal part of the Neon EVM economy.<br></p><p><strong>Why is P2P.org working with Neon Labs?</strong><br></p><ol><li>P2P.org endorses Neon EVM and supports its crucial role as a proxy operator, enabling Ethereum-like transactions to be efficiently executed on the Solana network. Recognizing the importance of cross-compatibility, P2P.org provides a robust infrastructure to facilitate the smooth operation of the Neon EVM, thereby ensuring seamless interaction of Ethereum-based applications on the Solana network.</li><li>P2P.org backs Neon EVM as it empowers Ethereum developers to build brand-new blockchain products, only possible on Solana, with much less friction and resources using familiar tools, such as Ethereum wallets and Solidity smart contracts. We believe that Neon EVM widens Solana's appeal, stimulates advanced dApp development, and fuels broader network adoption and evolution of DeFi space. In promoting competition across networks, P2P.org aims to drive the creation of superior end-user products.</li><li>Aligning with P2P.org's mission to increase blockchain technologies adoption and enhance user's DeFi experience, Solana-based Neon EVM's high throughput, low transaction costs, and user-friendly features, such as choosing a wrapped ERC-20 token for fee payment bring more flexibility, adaptability, speed, and a superior user experience to the blockchain ecosystem.<br></li></ol><p><strong>How Neon EVM could benefit the Solana ecosystem</strong><br></p><ul><li><strong>Drives liquidity</strong>: Neon EVM could create an additional inflow of liquidity to Solana, enhancing the robustness of its financial ecosystem.</li><li><strong>Expands user base</strong>: bringing existing large Ethereum DeFi protocols to Solana can significantly increase its user base, enabling users to leverage their established understanding of these protocols in a new environment.</li><li><strong>Promotes cross-compatibility:</strong> Neon EVM, by transforming Ethereum-like transactions for execution on the Solana network, contributes to enhancing the cross-compatibility between different blockchain protocols. This fosters a more interconnected and efficient blockchain ecosystem, paving the way for a more cooperative future in the decentralized world.</li><li><strong>Enhances dApp development</strong>: it enables the development of new high-load and sophisticated dApps on Solana using familiar tools. This opens up new possibilities for applications that can leverage Solana's high transaction speed and low costs.</li><li><strong>Boosts developer flexibility</strong>: Neon EVM provides more flexibility for smart contract developers, enabling them to deploy Ethereum-compatible applications on Solana without altering their codebase.</li><li><strong>Enables scalability: </strong>by leveraging Solana's ability to process transactions in parallel, Neon EVM provides an environment where Ethereum applications can be deployed and scaled effectively. This enhancement in performance is opening new avenues for the existing Ethereum protocols to operate at greater capacities.<br></li></ul><p><strong>Projects that are supporting Neon EVM</strong></p><ol><li>Sobal: Sobal is a project focused on forking the Balancer V2 protocol for deployment on Neon EVM. After thorough testing on Devnet, Sobal is advancing to the Neon EVM on Solana Mainnet.</li><li>Elk Finance: As a decentralized cross-chain liquidity network, Elk Finance enables users to conduct token trades and earn rewards.</li><li>Lever Finance: Acting as a multifunctional decentralized platform, Lever Finance offers leveraged trading, liquidity provision, farming, lending, and borrowing in the DeFi ecosystem.</li><li>Thetanuts: Thetanuts Finance is a front-runner in DeFi structured products protocol designed to generate diverse, organic yields. The platform caters to DAOs for treasury management and aids retail traders in earning organic yields on their assets.</li><li>DxSale: DxSale, a decentralized launchpad, can conduct token crowd sales with zero coding. It offers features such as presale setup and decentralized locking.</li><li>Protofire (Safe): Protofire, a development partner of Gnosis Safe, has helped develop the technology behind Gnosis Safe Multisig—a customizable Ethereum-based crypto wallet. This wallet allows access to DeFi apps and secure asset management through multi-signature confirmation requirements.</li><li>Robonomics: Robonomics is a unique open-source platform for IoT applications. It facilitates the exchange of technical and economic information through atomic transactions among user applications, IoT services, and robotics.</li><li>Kana Labs: Kana Labs offers a DeFi super app designed to demystify DeFi for all users. The app allows users to send/receive tokens, swap, stake, lend, and borrow across multiple blockchain networks such as Solana, Aptos, Neon, and Polygon.</li><li>xDAO: xDAO provides an easy-to-use platform for creating and managing decentralized autonomous organizations (DAOs) and the joint management of crypto assets.</li><li>Moraswap: MoraSwap, the first automated market maker (AMM) built on Neon EVM, brings high-speed, low-cost transactions to its users.</li><li>Powerpool: Powerpool is a unique protocol that allows governance token (GT) holders to lend, pool, borrow GTs, and generate income from it.</li><li>GhostNFT: GhostNFT is at the forefront of the NFT 2.0 standard, which enables asset-backed NFTs. This includes features such as sustainable NFT royalties backed by tangible assets and additional revenue streams for NFT collection creators.</li><li>Yin Finance: YIN Finance is a versatile NFT liquidity management platform. It allows users to utilize the project's strategy for effective high-yield liquidity management across different public chains and decentralized exchanges.</li><li>Poolz Finance: Poolz Finance is a decentralized swapping protocol empowering startups and project owners with the ability to auction their tokens to bootstrap liquidity.</li><li>Math Wallet: Math Wallet is a comprehensive, multi-platform cryptocurrency wallet that supports storage for all major blockchain tokens.</li><li>Etherspot: Etherspot offers an Account Abstraction SDK, promoting a seamless Web3 user experience. It caters to the needs of decentralized applications, game, and wallet developers through its multi-chain, self-custody smart contract wallet platform.</li><li>Zerion: Zerion Wallet is a secure, open-source, non-custodial cryptocurrency wallet. It acts as a Web3 Crypto Wallet with NFT and DeFi Portfolio Tracker.<br></li></ol><p><strong>How to start using Neon EVM?</strong><br></p><p>NEON token is necessary to make transactions in the Neon EVM as it is used as gas required for covering the Neon EVM transaction fees (more tokens will be supported in the future), so ensure you have enough NEON tokens for your planned activities. Here's an instruction on how to get Neon tokens and transfer them to Neon EVM:<br></p><p>1. <strong>Purchase NEON tokens</strong>: buy NEON tokens from CEXes such as Gate.io, ByBit, or CoinList.</p><p>2.<strong> Transfer NEON tokens to a Solana-compatible wallet</strong>: create or open a Solana-compatible wallet like Phantom / Solflare / Key App and copy the wallet address. Withdraw NEON from your CEX wallet to the Solana wallet following the instructions provided by the CEX platform.</p><p>3. <strong>Setup an EVM-compatible wallet</strong>: install an EVM-compatible wallet like MetaMask in your browser and set up your wallet:<br></p><p><em>Option A: Automatic Setup with Chainlist.org</em></p><ol><li>Install MetaMask extension and create a wallet.</li><li>Go to <a href="https://chainlist.org/?search=Neon+EVM+MainNet&testnets=false&ref=p2p.org">https://chainlist.org/?search=Neon+EVM+MainNet&testnets=false</a>.</li><li>Click "Connect Wallet" to allow Chainlist to automatically select the Neon Proxy operator for you or choose an operator you prefer from the dropdown list and click the "Connect Wallet" link near its RPC server address.</li><li>Follow MetaMask prompts to connect.</li></ol><p><em>Option B: Manual Configuration</em></p><ol><li>Install MetaMask extension and create a wallet.</li><li>In MetaMask, click the circle in the top right and select "Settings".</li><li>Select "Networks", then "Add Network".</li><li>Fill in the fields:</li></ol><ul><li>Network Name: "Neon EVM MainNet"</li><li>New RPC URL: use one of the Neon Proxy operators RPC server addresses that you can find on Chainlist by expanding the dropdown list: <a href="https://chainlist.org/?search=Neon+EVM+MainNet&testnets=false&ref=p2p.org">https://chainlist.org/?search=Neon+EVM+MainNet&testnets=false</a>.</li><li>We recommend using P2P.org's RPC server address as one of the most reliable options: <a href="https://neon-proxy-mainnet.solana.p2p.org/?ref=p2p.org">https://neon-proxy-mainnet.solana.p2p.org</a></li><li>Chain ID: 245022926</li><li>Currency Symbol: NEON</li><li>Block Explorer URL (optional): <a href="https://neonscan.org/?ref=p2p.org">https://neonscan.org</a></li></ul><p>5. Click "Save".<br></p><p>4. <strong>Use NeonPass to transfer NEON to Neon EVM</strong>: once the NEON tokens are in your Solana-compatible wallet, use the NeonPass (<a href="https://neonpass.live/?ref=p2p.org">https://neonpass.live</a>) transfer interface to move your tokens to Neon EVM. You can cover the transaction cost in NEON or SOL tokens. After completion, your funds will be available on the Neon EVM network, i.e., in your EVM-compatible wallet.<br></p><p>5. <strong>Start Using NEON on Neon EVM</strong>: now that your NEON tokens are in your EVM-compatible wallet on the Neon EVM, you can start using them for transaction costs or other uses in the Neon EVM ecosystem (you will be able to interact with the protocols deployed on the Neon EVM via corresponding dApps using Metamask). You can find the protocols that are supported by Neon EVM here: <a href="https://neonfoundation.io/ecosystem?ref=p2p.org">https://neonfoundation.io/ecosystem</a></p>
<p><strong>Introduction:</strong></p><p>Our team has been hard at work, and we're pleased to say that the new direct ETH staking app is now live in the Safe Apps Ecosystem. This blog post will guide you through how to use the P2P.org Non-Custodial direct ETH Staking App on Safe. Discover how to set up your wallet integration, find additional support from us, and seize the opportunity to stake your ETH effortlessly.</p><p></p><p><strong>The P2P.org App with Safe</strong></p><p>Safe is one of the most trusted decentralized custody protocols and collective asset management platforms on Ethereum. Holding and safeguarding billions of dollars in assets, Safe provides secure and <a href="https://www.google.com/url?q=https://docs.safe.global/learn/security/security-audits&sa=D&source=docs&ust=1686751866991915&usg=AOvVaw0Vm0CRfgmqRZjLRGu-89ff">audited</a> smart contract accounts for individuals and organizations.</p><p>The first-of-its-kind app on the Safe Apps Ecosystem allows users to quickly and easily direct stake ETH with just a few clicks while maintaining full custody of their assets.</p><p>Additionally, it will enable clients to avoid smart contract risks associated with liquid staking protocols. At the time of this article being created, Safe currently stores $39B+ in digital assets for its users. <br></p><p>The P2P.org Safe App integration is another step towards our vision to support non-custodial staking services to a growing DeFi community whilst allowing full ownership over your digital assets. Additionally, Safe users will still benefit from P2P.org's slashing protection guarantee when they direct stake their ETH through the app.</p><figure class="kg-card kg-video-card"><div class="kg-video-container"><video src="https://p2p.org/economy/content/media/2023/06/Safe-New.mp4" poster="https://img.spacergif.org/v1/1920x1080/0a/spacer.png" width="1920" height="1080" playsinline preload="metadata" style="background: transparent url('https://p2p.org/economy/content/images/2023/06/media-thumbnail-ember210.jpg') 50% 50% / cover no-repeat;" /></video><div class="kg-video-overlay"><button class="kg-video-large-play-icon"><svg xmlns="http://www.w3.org/2000/svg" viewBox="0 0 24 24"><path d="M23.14 10.608 2.253.164A1.559 1.559 0 0 0 0 1.557v20.887a1.558 1.558 0 0 0 2.253 1.392L23.14 13.393a1.557 1.557 0 0 0 0-2.785Z"/></svg></button></div><div class="kg-video-player-container"><div class="kg-video-player"><button class="kg-video-play-icon"><svg xmlns="http://www.w3.org/2000/svg" viewBox="0 0 24 24"><path d="M23.14 10.608 2.253.164A1.559 1.559 0 0 0 0 1.557v20.887a1.558 1.558 0 0 0 2.253 1.392L23.14 13.393a1.557 1.557 0 0 0 0-2.785Z"/></svg></button><button class="kg-video-pause-icon kg-video-hide"><svg xmlns="http://www.w3.org/2000/svg" viewBox="0 0 24 24"><rect x="3" y="1" width="7" height="22" rx="1.5" ry="1.5"/><rect x="14" y="1" width="7" height="22" rx="1.5" ry="1.5"/></svg></button><span class="kg-video-current-time">0:00</span><div class="kg-video-time">/<span class="kg-video-duration"></span></div><input type="range" class="kg-video-seek-slider" max="100" value="0"><button class="kg-video-playback-rate">1×</button><button class="kg-video-unmute-icon"><svg xmlns="http://www.w3.org/2000/svg" viewBox="0 0 24 24"><path d="M15.189 2.021a9.728 9.728 0 0 0-7.924 4.85.249.249 0 0 1-.221.133H5.25a3 3 0 0 0-3 3v2a3 3 0 0 0 3 3h1.794a.249.249 0 0 1 .221.133 9.73 9.73 0 0 0 7.924 4.85h.06a1 1 0 0 0 1-1V3.02a1 1 0 0 0-1.06-.998Z"/></svg></button><button class="kg-video-mute-icon kg-video-hide"><svg xmlns="http://www.w3.org/2000/svg" viewBox="0 0 24 24"><path d="M16.177 4.3a.248.248 0 0 0 .073-.176v-1.1a1 1 0 0 0-1.061-1 9.728 9.728 0 0 0-7.924 4.85.249.249 0 0 1-.221.133H5.25a3 3 0 0 0-3 3v2a3 3 0 0 0 3 3h.114a.251.251 0 0 0 .177-.073ZM23.707 1.706A1 1 0 0 0 22.293.292l-22 22a1 1 0 0 0 0 1.414l.009.009a1 1 0 0 0 1.405-.009l6.63-6.631A.251.251 0 0 1 8.515 17a.245.245 0 0 1 .177.075 10.081 10.081 0 0 0 6.5 2.92 1 1 0 0 0 1.061-1V9.266a.247.247 0 0 1 .073-.176Z"/></svg></button><input type="range" class="kg-video-volume-slider" max="100" value="100"></div></div></div></figure><p><strong>How to Set Up Your P2P.org Safe Wallet Integration:</strong></p><ul><li>Visit the Safe website: <a href="https://safe.global/?ref=p2p.org">https://safe.global/</a>.</li><li>Click on "Launch Wallet" to access your dashboard.</li><li>On the left-hand side, locate and click on "Apps" to enter the apps ecosystem.</li><li>Search for "P2P" or "P2P.org" to find the P2P.org app.</li><li>Select the app and click on "Open Safe App."</li><li>Read the Disclaimer and press "Continue."</li><li>Next, review the User Terms, tick the box to accept, and click "Accept."</li><li>Enter the amount of ETH you wish to stake (remember, the minimum requirement is 32 ETH), and click "Continue." This will set up the validator and infrastructure, which may take up to one minute.</li><li>Confirm the staking details on the screen, then click "Stake ETH" and confirm the transaction in your wallet.</li><li>Once the transaction is indexed, you can view it in the pending queue. Feel free to click the "Chat with us" button to connect with our customer support via the Telegram group <a href="https://t.me/P2Pstaking?ref=p2p.org">@P2Pstaking</a>.</li><li>Head back to your dashboard to access the details of your staked ETH and monitor the status of your transaction.</li><li>If you encounter any questions or need further assistance, our dedicated support team is here to help. Join our Telegram group @P2Pstaking to connect with our knowledgeable staff and engage with the P2P.org community.</li></ul><p>You should now all be set up and ready to embark on your staking journey with P2P.org's direct ETH Staking App on Safe. Enjoy the benefits of secure and hassle-free staking while maintaining complete control and ownership of your assets. <br></p><div class="kg-card kg-button-card kg-align-center"><a href="https://app.safe.global/share/safe-app?appUrl=https%3A%2F%2Feth.p2p.org&chain=eth&ref=p2p.org" class="kg-btn kg-btn-accent">Stake with safe</a></div><p></p>
 ALL
Agoric
Aptos
Auth
Avail
Avalanche
Axelar
Babylon
Bitcoin
BTC
capital flow
Cardano
Celestia
certifications
Chainlink
compliance
Cosmos
Crescent
curator
Cyberway
DAOBet
Data stream
DeFi
defi dispatch
defi infrastrcuture
defi infrastructure
defi news
defi vault
due diligence
DVT
Dymension
Economy
Education
EigenLayer
Elrond
employee
employee advocacy
employee interviews
Ethereum
Evmos
exit queue
Explain Like I'm Five
Governance
Guide
hedge fund
how to
HR
HUB series
Hyperliquid
infrastructure
institutional lens
Kava
Kusama
landing
legal layer
Lido
liquid staking
LSP
Manta
Mantle
Marlin
Matic
MiCA
Moonbeam
MultiversX
Near
Networks
News
NuCypher
Oasis
Obol
Origin
P2P Verified
Partnership
pectra
Persistence
playbook
Pocket
Polkadot
Polygon
product
products
Quicksilver
Regen
regulation
Renzo
restaking
RPC Node
Sender
Serum
slashing
Solana
SSV
SSV.Network
ALL
Agoric
Aptos
Auth
Avail
Avalanche
Axelar
Babylon
Bitcoin
BTC
capital flow
Cardano
Celestia
certifications
Chainlink
compliance
Cosmos
Crescent
curator
Cyberway
DAOBet
Data stream
DeFi
defi dispatch
defi infrastrcuture
defi infrastructure
defi news
defi vault
due diligence
DVT
Dymension
Economy
Education
EigenLayer
Elrond
employee
employee advocacy
employee interviews
Ethereum
Evmos
exit queue
Explain Like I'm Five
Governance
Guide
hedge fund
how to
HR
HUB series
Hyperliquid
infrastructure
institutional lens
Kava
Kusama
landing
legal layer
Lido
liquid staking
LSP
Manta
Mantle
Marlin
Matic
MiCA
Moonbeam
MultiversX
Near
Networks
News
NuCypher
Oasis
Obol
Origin
P2P Verified
Partnership
pectra
Persistence
playbook
Pocket
Polkadot
Polygon
product
products
Quicksilver
Regen
regulation
Renzo
restaking
RPC Node
Sender
Serum
slashing
Solana
SSV
SSV.Network