A step-by-step guide on how to stake POND/MPOND tokens using the Marlin staking platform together with Metamask or Wallet Connect.
Marlin is a layer-0 protocol focused on network-layer performance, security and robustness. Marlin Protocol speeds up block propagation of existing blockchains to enable higher throughput.
Marlin Protocol Staking
When you stake POND or MPOND tokens, you are increasing the security of the Marlin network while earning more POND tokens by delegating your tokens to clusters that participate in Marlin network.
If you own a hardware device such as a Ledger Nano S or X, we strongly suggest using it for your staking operations. The process is pretty much the same as described in this guide. The only difference is that you need to sign transactions via your hardware device instead of using your browser.
Staking your POND/MPOND via the Marlin staking platform or the MetaMask wallet involves two main steps:
Step 1: Connecting your MetaMask wallet address to the Marlin staking platform.
Step 2: Creating a stash and delegating your POND/MPOND tokens to P2P.
Step 1: Connect your MetaMask wallet address
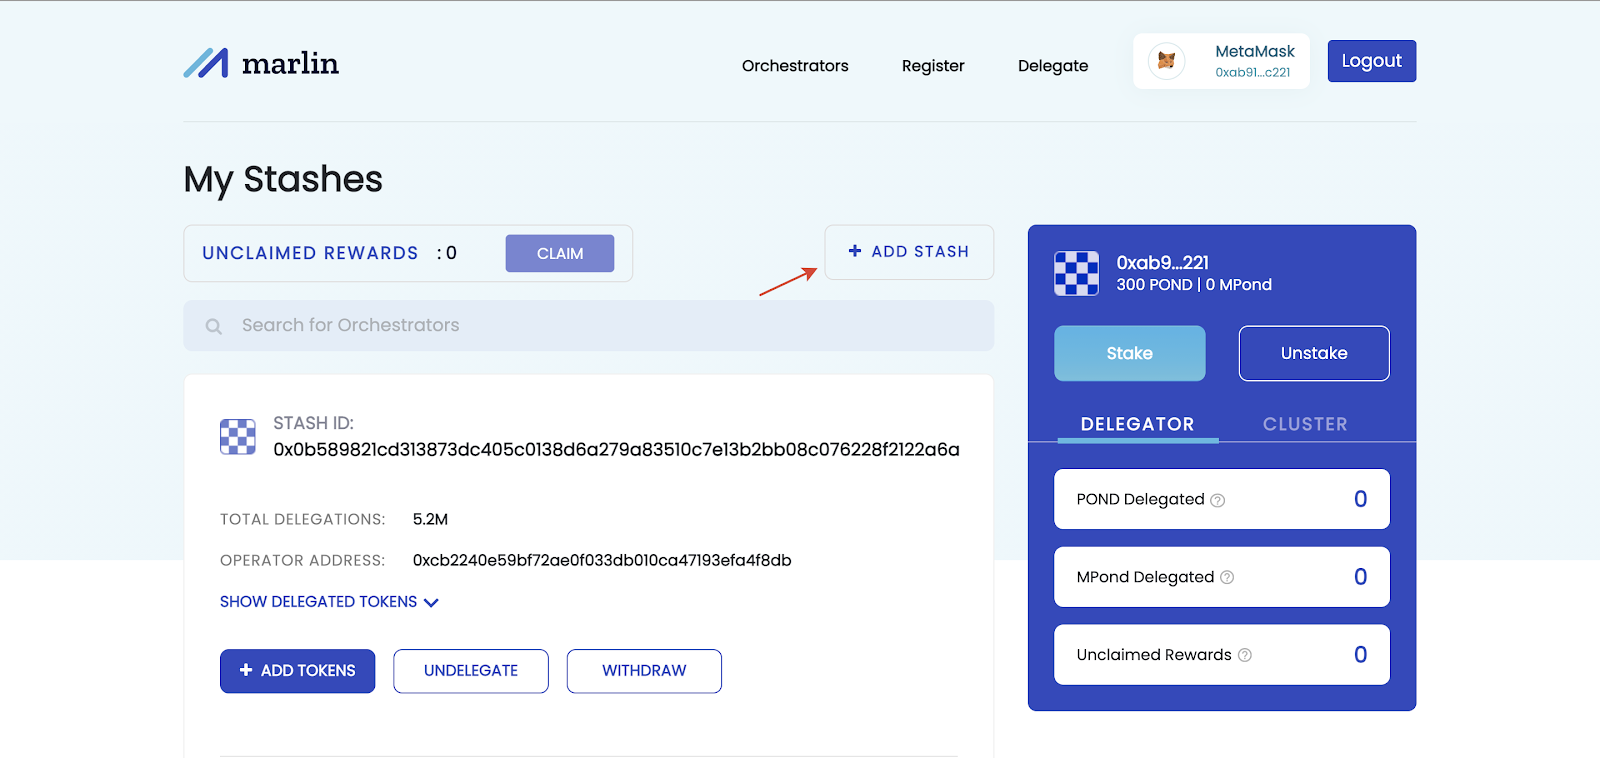
Visit https://arb1.marlin.org/relay/stash and connect your ETH address with POND or MPOND. Note that the address must be connected to the Ethereum network. After a successful connection, click the "Add Stash" button.
Step 2: Create a stash and delegate POND/MPOND
To delegate your tokens to the cluster you must create a stash. Tokens are moved to a stash and then you can choose whichever cluster the tokens in the stash should be delegated to. You can have multiple stashes to delegate to multiple clusters. This just provides more flexibility.
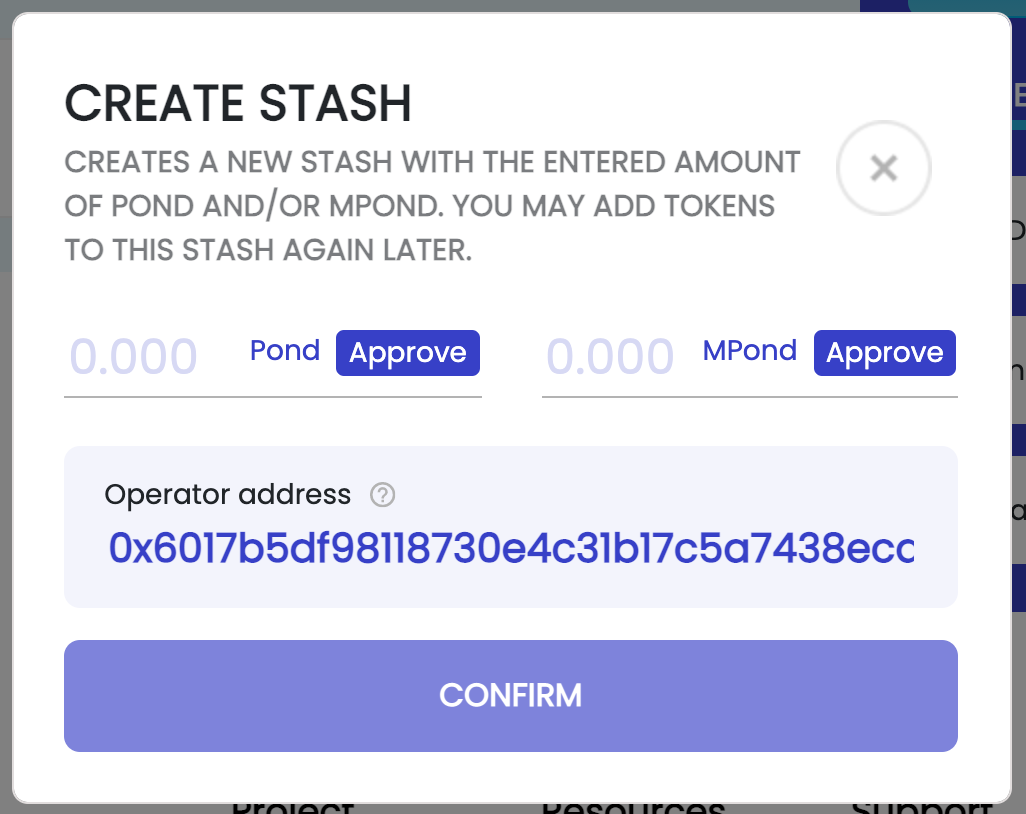
To get started with a delegation, enter the number of PONDs/MPONDs you plan to delegate, as well as the operator address as follows:
P2P Validator Operator Addresses:
0x6017b5df98118730e4c31b17c5a7438ecaa8887b
0x785ceab6bec10ca9634bce3a60f4124add801f0c
0xcbebfc74163cf5777a58201702e27dbfded6e2f5
We recommend that you create several stashes at the first stage to deposit some of your funds. This is because the probability of choosing a cluster is quadratic. Clusters with a large number of delegations may give lower returns. The un-delegation period is 30 days. We will monitor the performance of our cluster and take the necessary actions to increase the profitability of our delegates.
To stake POND, a user must first make an Approve transaction before creating a Stash. If you are going to create multiple stash accounts, you can make an Approve transaction for the full amount of one transaction and then create stash accounts afterwards.
Approve the numbers and click the Confirm button and confirm the transaction on the MetaMask wallet. In order to succeed, you will need to have ETH to pay for the transaction fee. After the transaction, it takes some time for your stash to be reflected in the interface.
If you don't see your stash for a long time, make a hard reload of the page by pressing ctrl/cmd + shift + R.
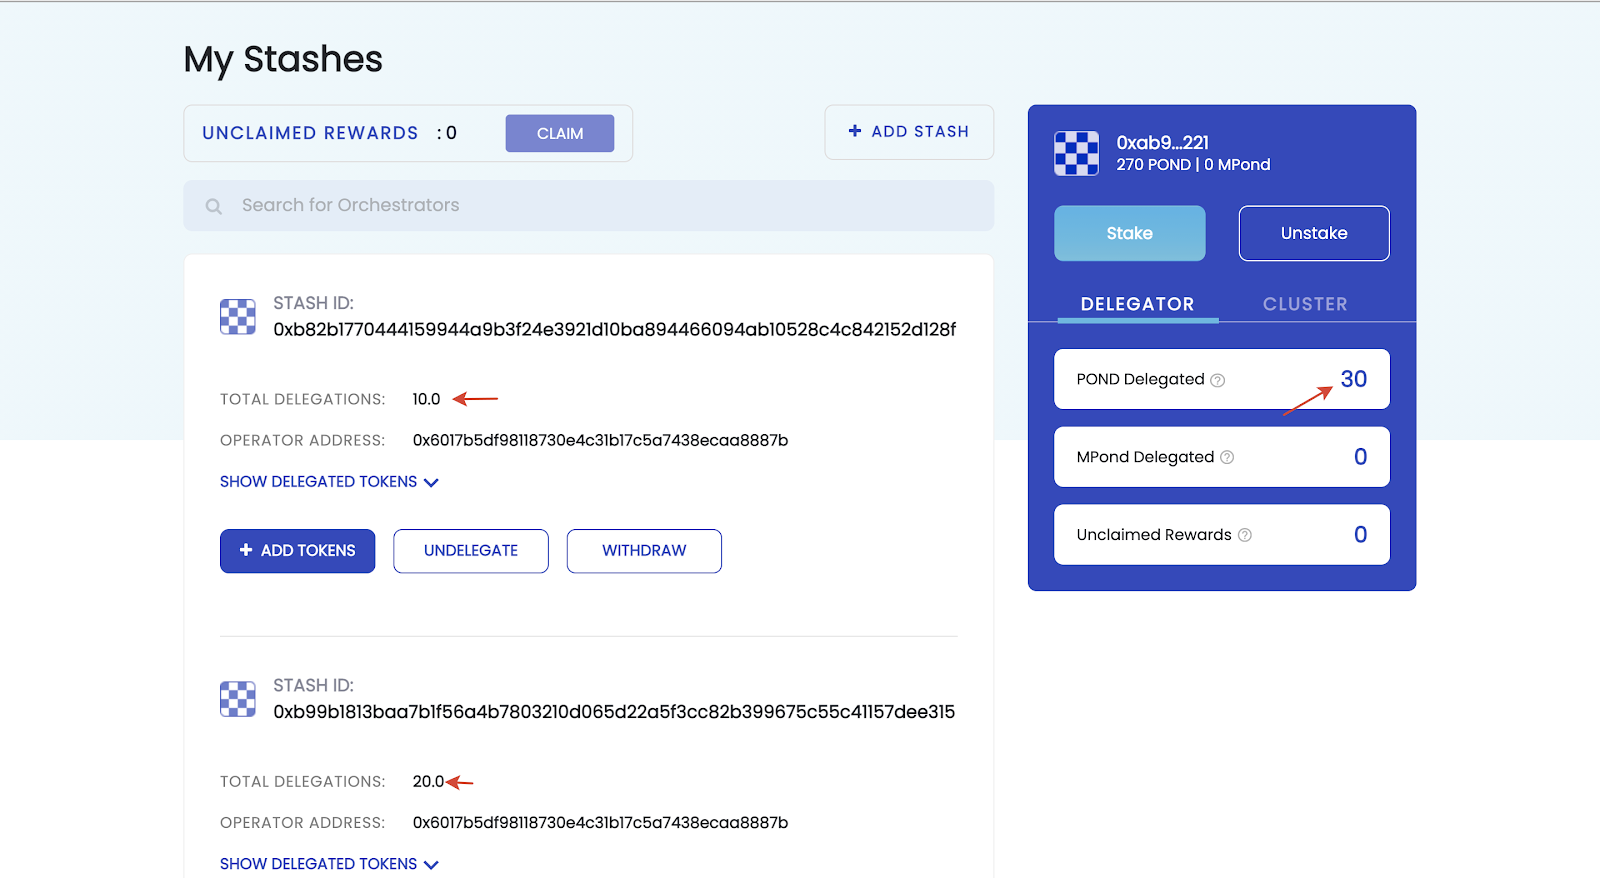
After successfully creating a stash, you will see all the information about your POND/MPOND Delegation within the interface. To delegate more POND or MPOND to an existing stash, click on Add Tokens underneath the My Stashes section.
Marlin (POND) Staking FAQ:
Rewards are distributed once per day.
Rewards do not auto-compound. To compound your POND rewards, you must claim them.
Unclaimed rewards (in POND) appear under My Stashes at app.marlin.pro/relay/stash.
Click the Claim button to withdraw rewards. Rewards can be withdrawn at any time and do not affect on-going delegations.
The Marlin un-bonding period is currently set to 30 days.
Re-delegation of POND tokens to another delegator has a delay of 6 hours.
Alternative approach: Choosing Operator
Alternative to the steps above, you can stake directly with P2P through the following steps:
Connect your wallet via the ‘Connect Wallet’ button in the top right corner. You can use either MetaMask or WalletConnect.
Pick P2P.ORG as your Marlin cluster operator by clicking on the Delegate icon.
A pop up will appear - choose the amount of POND and/or MPOND token you want to stake and approve.
Once the transaction has been mined, click Confirm to create a stash and delegate it to P2P.
Once completed you will be able to view the Stash within the My Stashes section. Here you will also be able to view staked POND and MPOND tokens by clicking Show Delegated Tokens.
To delegate more POND or MPOND to an existing stash, click on Add Tokens underneath the My Stashes section.
About P2P Validator
P2P Validator is a world-leading non-custodial staking provider securing more than $3 billion from over 10,00 delegators across 25+ high-class networks.
<p>The following is a step-by-step guide to transferring MPONDs earned in FlowMint stakedrop from Matic to Ethereum, and staking them using the Marlin network for an approximate APR of 10-12%.</p><h3 id="adding-mpond-to-metamask">Adding MPOND to MetaMask</h3><ol><li>To begin, you must <a href="https://p2p.org/economy/how-to-claim-mpond-during-flowmint-stakedrop/">harvest your MPOND</a> from FlowMint stakedrop.</li><li>To see your MPONDs on the MetaMask on Matic, add the MPOND token as a Custom Token in the MetaMask settings. To do so, navigate to MetaMask, click 'Add Token' and input the contract code below:</li></ol><p> MPOND contract - <strong>0x27B064fE4B708fDa0fD0C4ff2b78a1e4DAB812D1</strong>.</p><h3 id="transferring-mpond-from-matic-to-metamask">Transferring MPOND from Matic to MetaMask</h3><ol><li>To begin the process, go to <a href="https://wallet.matic.network/bridge?ref=p2p.org">wallet.matic.network/bridge</a> and connect your MetaMask using the Matic Network add-in.</li></ol><p>When prompted, select the following options:</p><ul><li><em>From Matic to Ethereum</em></li><li><em>Transfer Mode: PoS Bridge</em></li><li><em>Token: Marlin (Mpond)</em></li></ul><p>After configuring details, press Transfer.</p><figure class="kg-card kg-image-card"><img src="https://lh3.googleusercontent.com/-EPHar6mXzR9g4b_aUHtuwoYeNopbVCum-9xgKtG2oYHAogiNDx8kA39im7CPhDp08P9uywP7hMABMUWXYT2hyes8q2Xk-PUmsUW4ZsiWhdvCi4vXVUY4KfcZCBREuevG0iAeT57" class="kg-image" alt loading="lazy"></figure><p><br>After pressing transfer you will be prompted with a transaction overview screens. Press continue as in the screenshots pictured below. </p><figure class="kg-card kg-image-card"><img src="https://p2p.org/economy/content/images/2021/04/image-2.png" class="kg-image" alt loading="lazy" width="2000" height="915" srcset="https://p2p.org/economy/content/images/size/w600/2021/04/image-2.png 600w, https://p2p.org/economy/content/images/size/w1000/2021/04/image-2.png 1000w, https://p2p.org/economy/content/images/size/w1600/2021/04/image-2.png 1600w, https://p2p.org/economy/content/images/size/w2400/2021/04/image-2.png 2400w" sizes="(min-width: 720px) 720px"></figure><p>After confirming the transaction, you have to wait for the initialisation process. You can see the transaction status in the upper right corner. After a successful confirmation, you will pay fee in MATIC.</p><figure class="kg-card kg-image-card"><img src="https://p2p.org/economy/content/images/2021/04/image-1.png" class="kg-image" alt loading="lazy" width="2000" height="774" srcset="https://p2p.org/economy/content/images/size/w600/2021/04/image-1.png 600w, https://p2p.org/economy/content/images/size/w1000/2021/04/image-1.png 1000w, https://p2p.org/economy/content/images/size/w1600/2021/04/image-1.png 1600w, https://p2p.org/economy/content/images/size/w2400/2021/04/image-1.png 2400w" sizes="(min-width: 720px) 720px"></figure><p>Once the "Checkpoint" has arrived [see image on the right above], switch the network in the MetaMask settings from Matic to Ethereum and click Continue.</p><p>Sign the transaction on the Ethereum network to initiate the withdrawal of MPOND tokens from Matic to Ethereum.</p><figure class="kg-card kg-image-card"><img src="https://p2p.org/economy/content/images/2021/04/image-3.png" class="kg-image" alt loading="lazy" width="2000" height="1072" srcset="https://p2p.org/economy/content/images/size/w600/2021/04/image-3.png 600w, https://p2p.org/economy/content/images/size/w1000/2021/04/image-3.png 1000w, https://p2p.org/economy/content/images/size/w1600/2021/04/image-3.png 1600w, https://p2p.org/economy/content/images/size/w2400/2021/04/image-3.png 2400w" sizes="(min-width: 720px) 720px"></figure><p>After the transaction is signed, you will receive the MPOND tokens on the Ethereum network. To see the MPOND token in Metamask, use the MPOND contract address on the Ethereum network. </p><p>MPOND contract address: 0x1C77d15857646687005dbbAfFf5873F4495a9731</p><p>Now you can stake your MPOND tokens! </p><p>Use the following tutorial to <a href="https://p2p.org/economy/stake-pond-with-marlin/">stake your POND/MPOND tokens with P2P Validator</a>.</p><hr><p><strong><strong>If you have any questions, </strong>please stop by the<strong> </strong><a href="https://t.me/P2Pstaking?ref=p2p.org">P2P T<strong>elegram</strong></a>.</strong></p><hr><h3 id="about-p2p-validator"><strong>About P2P Validator</strong></h3><p>P2P Validator is a world-leading non-custodial staking provider securing more than $3.2 billion from over 10,000 delegators across 25+ high-class staking networks. </p><h3 id="learn-more-">Learn more:</h3><p><strong>Web</strong>: <a href="https://p2p.org/?utm_source=blog&utm_campaign=sol_guide">p2p.org</a><br><strong>Twitter</strong>: <a href="https://twitter.com/P2Pvalidator?ref=p2p.org">@p2pvalidator</a><br><strong>LinkedIn</strong>: <a href="https://www.linkedin.com/company/p2p-org/?ref=p2p.org">linkedin.com/company/p2p-org</a><br><strong>Telegram</strong>: <a href="https://t.me/P2Pstaking?ref=p2p.org">t.me/P2Pstaking</a></p>
<p>This tutorial helps you stake and manage <a href="https://coinmarketcap.com/currencies/cosmos/?ref=p2p.org">ATOM</a> tokens on the <a href="https://p2p.org/cosmos?ref=p2p.org">Cosmos</a> blockchain, using both the <a href="https://keplr.app/?ref=p2p.org">Keplr</a> Browser Extension and Web Wallet together with your favorite <a href="https://www.ledger.com/?ref=p2p.org">Ledger</a> device.</p><h3 id="this-guide-will-help-you">This guide will help you</h3><ol><li>Set up your Keplr Wallet.</li><li>Stake ATOMs on the Cosmos blockchain to earn ATOM staking rewards.</li><li>Manage your Cosmos ATOM stake and grow your portfolio</li></ol><h3 id="before-you-start">Before you start:</h3><ul><li>Download and install the newest version of <a href="https://www.ledger.com/ledger-live/download?ref=p2p.org">Ledger Live</a> on your desktop machine.</li><li>Update your <a href="https://support.ledger.com/hc/en-us/articles/360002731113-Update-Ledger-Nano-S-firmware?ref=p2p.org">Ledger</a> device to the newest firmware.</li><li>Install the latest version of the Cosmos App on your Ledger device.<br></li></ul><p>See below for a step-by-step guide.</p>
<!--kg-card-begin: html-->
<br />
<!--kg-card-end: html-->
<h3 id="i-setting-up-your-keplr-wallet">I. Setting up your Keplr Wallet</h3><ol><li>Open the Keplr Browser Extension (available for <a href="https://chrome.google.com/webstore/detail/keplr/dmkamcknogkgcdfhhbddcghachkejeap?ref=p2p.org">Chrome and Brave</a>) and press ‘Import Ledger’.</li></ol><figure class="kg-card kg-image-card"><img src="https://p2p.org/economy/content/images/2021/02/image-1.png" class="kg-image" alt="" loading="lazy" width="384" height="455"></figure><p>2. Give the account a name, then click ‘Next’.</p><figure class="kg-card kg-image-card"><img src="https://p2p.org/economy/content/images/2021/02/image-2.png" class="kg-image" alt="" loading="lazy" width="384" height="455"></figure><p>3. Plug in and unlock your Ledger device. Open the Cosmos app and click ‘Next’.</p><p>4. Your Keplr account is successfully connected to your Ledger device.</p><figure class="kg-card kg-image-card"><img src="https://p2p.org/economy/content/images/2021/02/image-3.png" class="kg-image" alt="" loading="lazy" width="384" height="556"></figure><p>Now let's start staking!</p>
<!--kg-card-begin: html-->
<br />
<!--kg-card-end: html-->
<h3 id="ii-staking-atom-on-the-cosmos-blockchain">II. Staking ATOM on the Cosmos blockchain</h3><ol><li>Open the Keplr Browser Extension and choose your Ledger account (via the ‘human icon’).</li><li>Copy your address by clicking ‘Deposit’ first, then fund your account with ATOM.</li><li>Once you have a balance, you can proceed with the ‘<a href="https://wallet.keplr.app/?ref=p2p.org#/cosmoshub-4/stake">Stake</a>’ option.</li></ol><figure class="kg-card kg-image-card"><img src="https://p2p.org/economy/content/images/2021/02/image-4.png" class="kg-image" alt="" loading="lazy" width="904" height="282" srcset="https://p2p.org/economy/content/images/size/w600/2021/02/image-4.png 600w, https://p2p.org/economy/content/images/2021/02/image-4.png 904w" sizes="(min-width: 720px) 720px"></figure><p>4. Choose your validator (<strong>P2P.ORG</strong>) then click ‘Manage’ and ‘Delegate’ in the next picture.</p><p>5. Choose the amount of ATOMs you want to stake and click ‘Delegate’.</p><figure class="kg-card kg-gallery-card kg-width-wide"><div class="kg-gallery-container"><div class="kg-gallery-row"><div class="kg-gallery-image"><img src="https://p2p.org/economy/content/images/2021/02/image-5-1.png" width="392" height="357" loading="lazy" alt=""></div><div class="kg-gallery-image"><img src="https://p2p.org/economy/content/images/2021/02/image-6.png" width="392" height="357" loading="lazy" alt=""></div></div></div></figure><p>6. Set your preferred fee (there are three options available) by hitting ‘Set Fee’.</p><figure class="kg-card kg-image-card"><img src="https://p2p.org/economy/content/images/2021/02/image-7.png" class="kg-image" alt="" loading="lazy" width="304" height="474"></figure><p>7. In the following window, double-check the amount you are going to delegate as well as the P2P.org address (you can see the first and last few digits only).</p><figure class="kg-card kg-image-card"><img src="https://p2p.org/economy/content/images/2021/02/image-8.png" class="kg-image" alt="" loading="lazy" width="304" height="470"></figure><p>8. Check the information on your Ledger device and click ‘Approve’ on it.</p><p>9. Use the Dashboard within the <a href="https://wallet.keplr.app/?ref=p2p.org#/cosmoshub-4/stake">Keplr Web Wallet</a> or <a href="https://www.mintscan.io/cosmos?ref=p2p.org">Mintscan</a>, one of the popular block-explorers, to see whether your delegation was successful.</p>
<!--kg-card-begin: html-->
<br />
<!--kg-card-end: html-->
<!--kg-card-begin: html-->
<div class="address-card">
<p class="address-card__label"><strong>P2P.org Cosmos address:</strong></p>
<p class="address-card__address">cosmosvaloper132juzk0gdmwuxvx4phug7m3ymyatxlh9734g4w</p>
</div>
<!--kg-card-end: html-->
<!--kg-card-begin: html-->
<br />
<!--kg-card-end: html-->
<p>Now let’s try to manage your staking assets.</p>
<!--kg-card-begin: html-->
<br />
<!--kg-card-end: html-->
<h2 id="iii-managing-your-cosmos-stake">III. Managing your Cosmos stake</h2><h3 id="claim-your-atom-staking-rewards">Claim your ATOM staking rewards</h3><ol><li>Open the Keplr Browser Extension and click ‘Claim’.</li><li>Choose your comfortable fee by hitting ‘Set Fee’ in the appropriate pop-up screen.</li><li>Plug in your Ledger device, unlock, and open the Cosmos app on it, then click ‘Next’ in the Browser Extension pop-up.</li><li>Review the transaction on your Ledger device and confirm it by hitting the two buttons on your hard wallet.</li></ol><h3 id="compound-your-atom-staking-rewards-to-increase-your-return">Compound your ATOM staking rewards to increase your return</h3><ol><li>Open the Keplr Web Wallet and, find your validator (P2P.org) in the Staking Menu, click ‘Manage’ and then ‘Delegate’.</li><li>Choose the fees in the subsequent pop-up, hit ‘Set Fee’.</li><li>Plug in your Ledger device, unlock, and open the Cosmos app on it, then click ‘Next’ in the Browser Extension pop-up.</li><li>Review and sign transaction by hitting ‘Approve’ on your Ledger device.</li></ol>
<!--kg-card-begin: html-->
<br />
<!--kg-card-end: html-->
<!--kg-card-begin: html-->
<div class="note-card">
<strong>Cosmos (ATOM) Staking FAQ:</strong>
<ul>
<br />
<li>The current ATOM staking APY is approximately 10.60% per year.</li>
<li>You need to have some funds remaining on your account while staking to ensure you can cover transaction fees.</li>
<li>Claiming rewards is a manually process which involves transaction fees.</li>
<li>Cosmos staking rewards are paid out in real-time, with rewards accruing approximately every 7 seconds.</li>
<li>The Cosmos network has a 21 day unstaking period throughout which your tokens will not be transferable.</li>
</ul>
</div>
<!--kg-card-end: html-->
<!--kg-card-begin: html-->
<br />
<!--kg-card-end: html-->
<p>That’s it.</p><p>Now you know how to delegate and compound your Cosmos staking rewards using both the Keplr Browser Extension and the Keplr Web Wallet together with your Ledger device.</p><p>If any questions arise, whether on <a href="https://p2p.org/cosmos?ref=p2p.org">Cosmos staking</a> or not, feel free to contact us via <a href="https://twitter.com/p2pvalidator?ref=p2p.org">Twitter</a>, <a href="https://t.me/P2Pstaking?ref=p2p.org">Telegram</a>, <a href="https://www.linkedin.com/company/p2p-org/?ref=p2p.org">LinkedIn</a>, or <a href="https://p2p.org/?ref=p2p.org#contact-us">email</a>.</p>
<!--kg-card-begin: html-->
<br />
<!--kg-card-end: html-->
<p><strong>About P2P.org</strong><br><a href="https://p2p.org/?ref=p2p.org"><em>P2P</em></a><em>.org is a world-leading <strong>non-custodial staking provider</strong> with the best industry practices and proven expertise. We provide comprehensive due-diligence of digital assets and offer only high class staking opportunities securing more than 3<strong> billion of USD</strong> value at the time of the latest update.</em></p><p><em>P2P.org is <strong>trusted by over 24,000 delegators</strong> across 25+ networks. We are a major player in all networks we support because of our experience, commitments and our <strong>reputation</strong>. We pay special attention to the process of governance. </em></p>
 ALL
Agoric
Aptos
Auth
Avail
Avalanche
Axelar
Babylon
Bitcoin
BTC
Cardano
Celestia
Chainlink
Cosmos
Crescent
Cyberway
DAOBet
DeFi
DVT
Dymension
Economy
Education
EigenLayer
Elrond
Ethereum
Evmos
Explain Like I'm Five
Guide
HR
Kava
Kusama
Lido
LSP
Manta
Mantle
Marlin
Matic
Moonbeam
MultiversX
Near
News
NuCypher
Oasis
Origin
Partnership
Persistence
Pocket
Polkadot
Polygon
Quicksilver
Regen
Renzo
restaking
RPC Node
Serum
slashing
Solana
SSV.Network
Staking
Starknet
Sui
symbiotic
Terra
Tezos
TheGraph
Threshold
Update
Vara
Vega
ALL
Agoric
Aptos
Auth
Avail
Avalanche
Axelar
Babylon
Bitcoin
BTC
Cardano
Celestia
Chainlink
Cosmos
Crescent
Cyberway
DAOBet
DeFi
DVT
Dymension
Economy
Education
EigenLayer
Elrond
Ethereum
Evmos
Explain Like I'm Five
Guide
HR
Kava
Kusama
Lido
LSP
Manta
Mantle
Marlin
Matic
Moonbeam
MultiversX
Near
News
NuCypher
Oasis
Origin
Partnership
Persistence
Pocket
Polkadot
Polygon
Quicksilver
Regen
Renzo
restaking
RPC Node
Serum
slashing
Solana
SSV.Network
Staking
Starknet
Sui
symbiotic
Terra
Tezos
TheGraph
Threshold
Update
Vara
Vega