This guide will walk you through the process of creating an account in Polkadot using Ledger hardware wallet and staking using a proxy account. If you have more than 200,000 DOT contact us to find out about our special staking conditions.
💡
In a recent Polkadot update controllers’ accounts were depreciated in favour of proxy accounts. From now on it’s impossible to attach a controller account to a stash. The only remaining option is to directly connect a proxy account to the stash account, with the proxy granted limited rights.
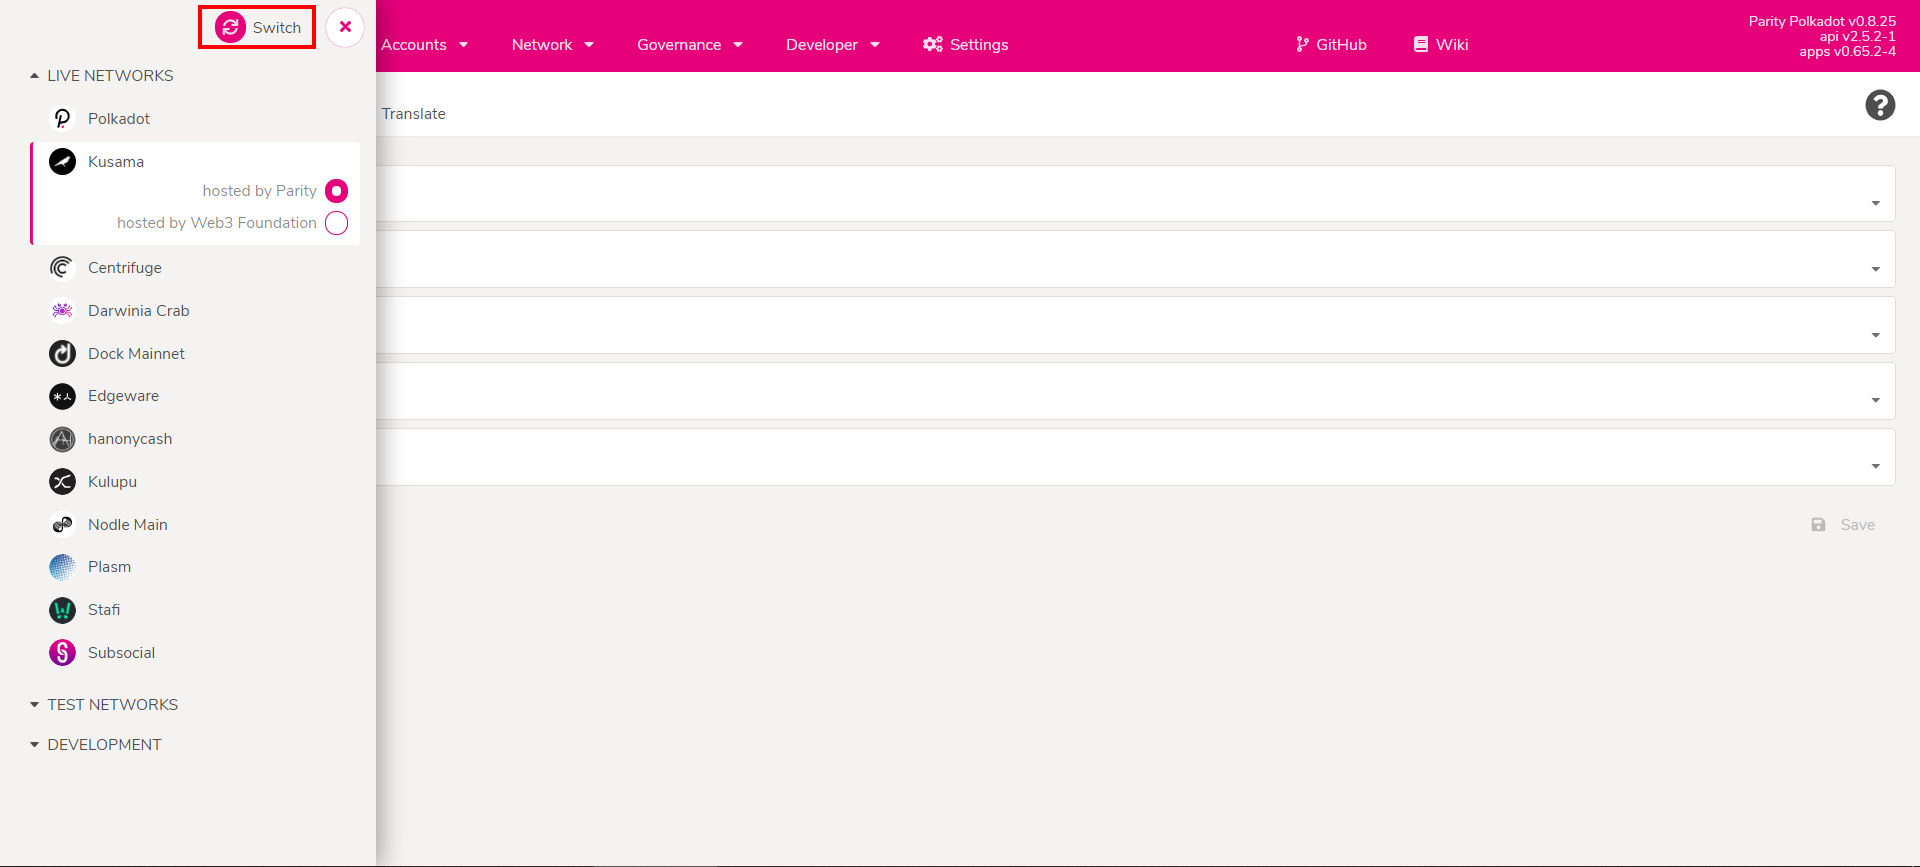
To continue with Kusama switch the network and follow the same steps as for Polkadot.
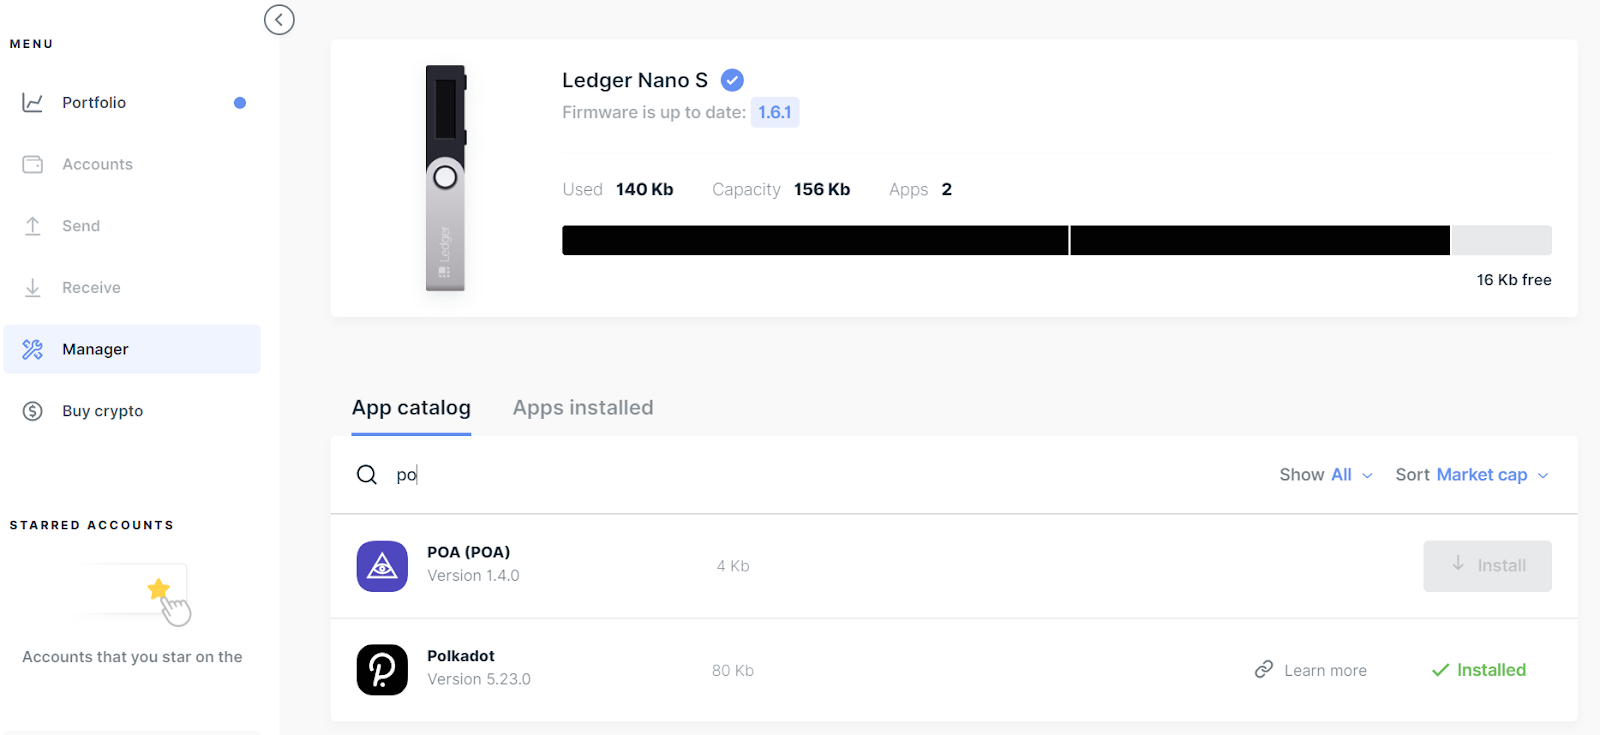
Download Ledger Live on your device and connect your hardware wallet. Make sure that Ledger firmware is up to date. Install the Polkadot/Kusama application.
Go to PolkadotJS UI using Chrome and navigate to the Settings tab. In the dropdown menu related to hardware connections select Attach Ledger via WebUSB and press Save.
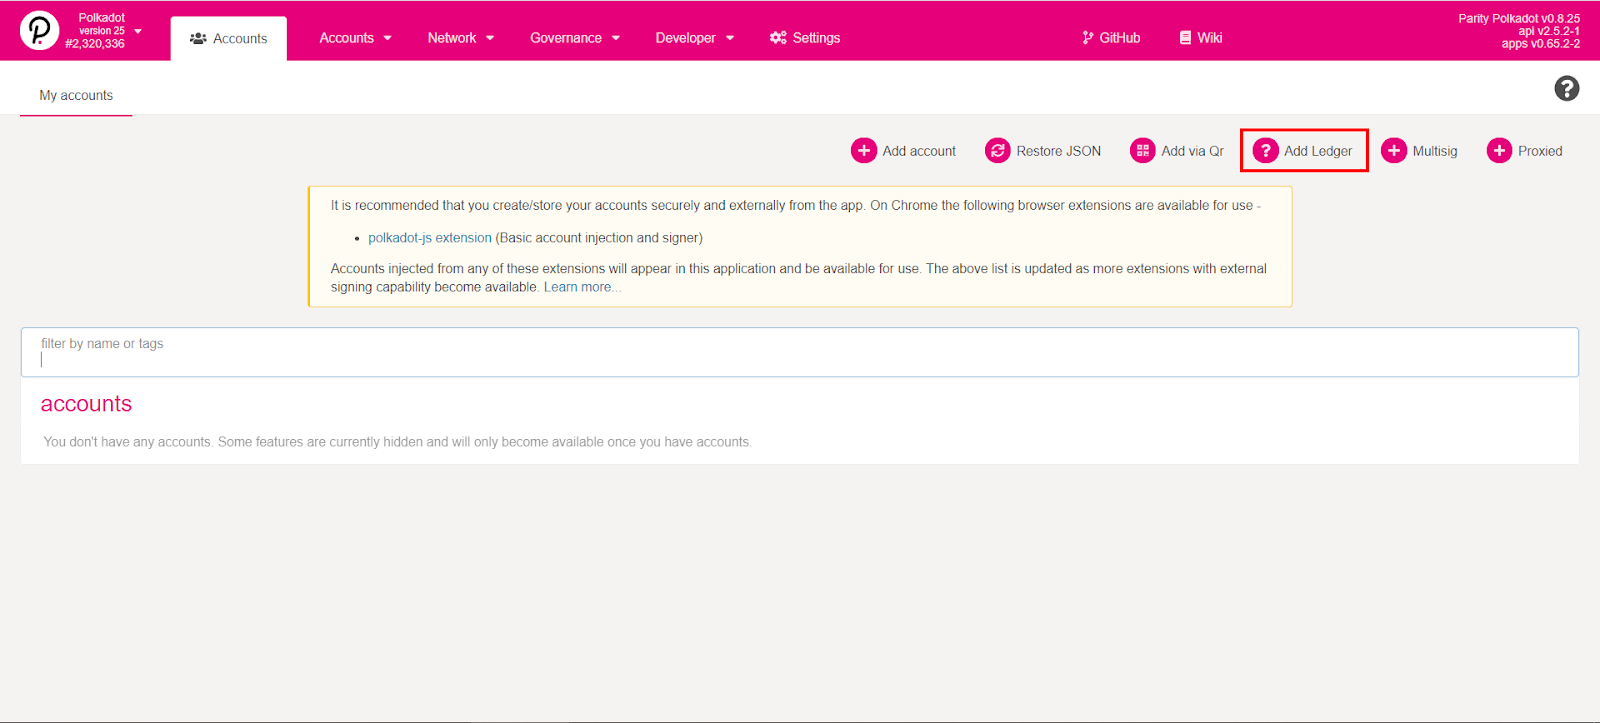
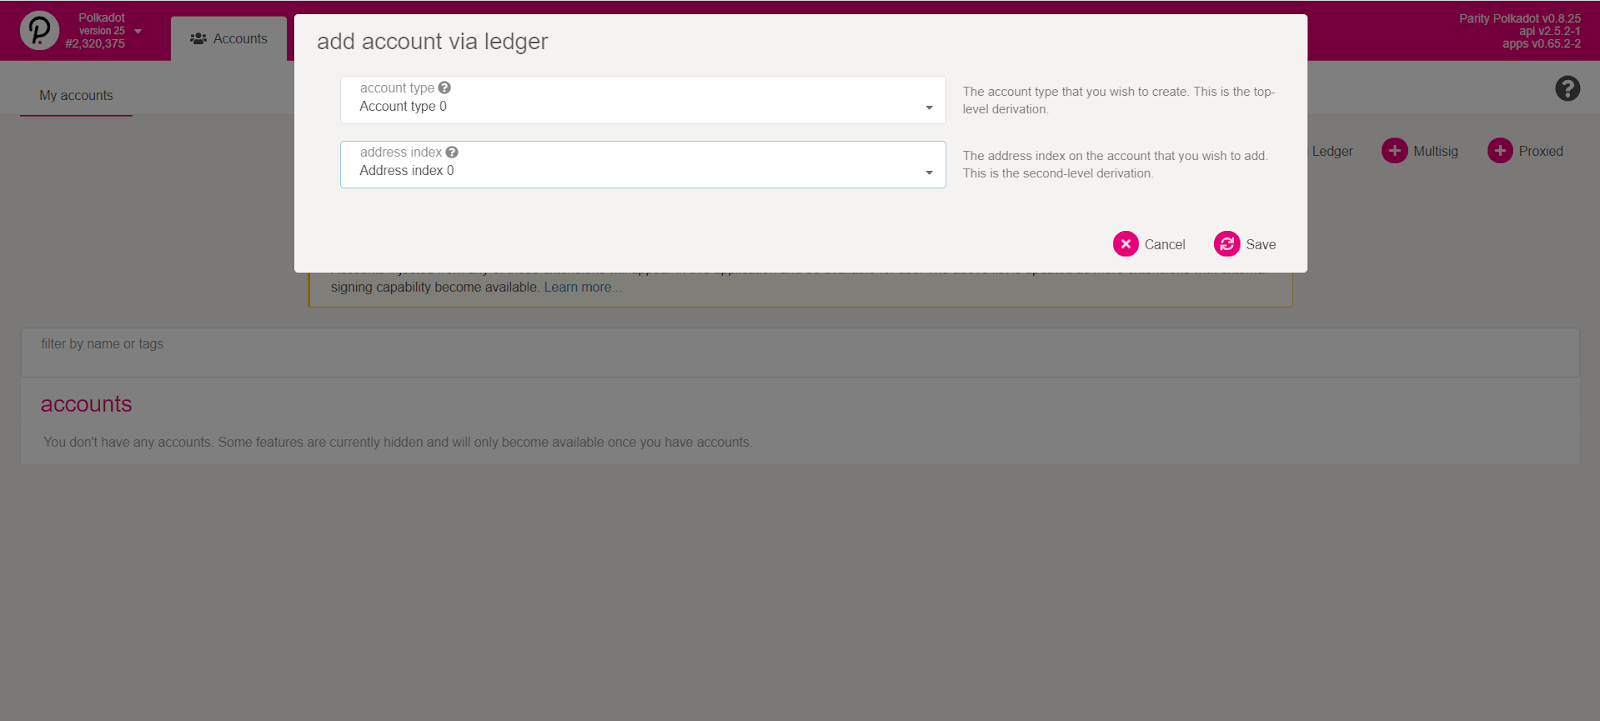
2. Go to the Accounts tab and press Add Ledger button to create an account
3. On your Ledger wallet, navigate to the Polkadot/Kusama app that you downloaded in Step 1 and select it by pressing two buttons on your Ledger. Go back to the screen on your device and click Save.
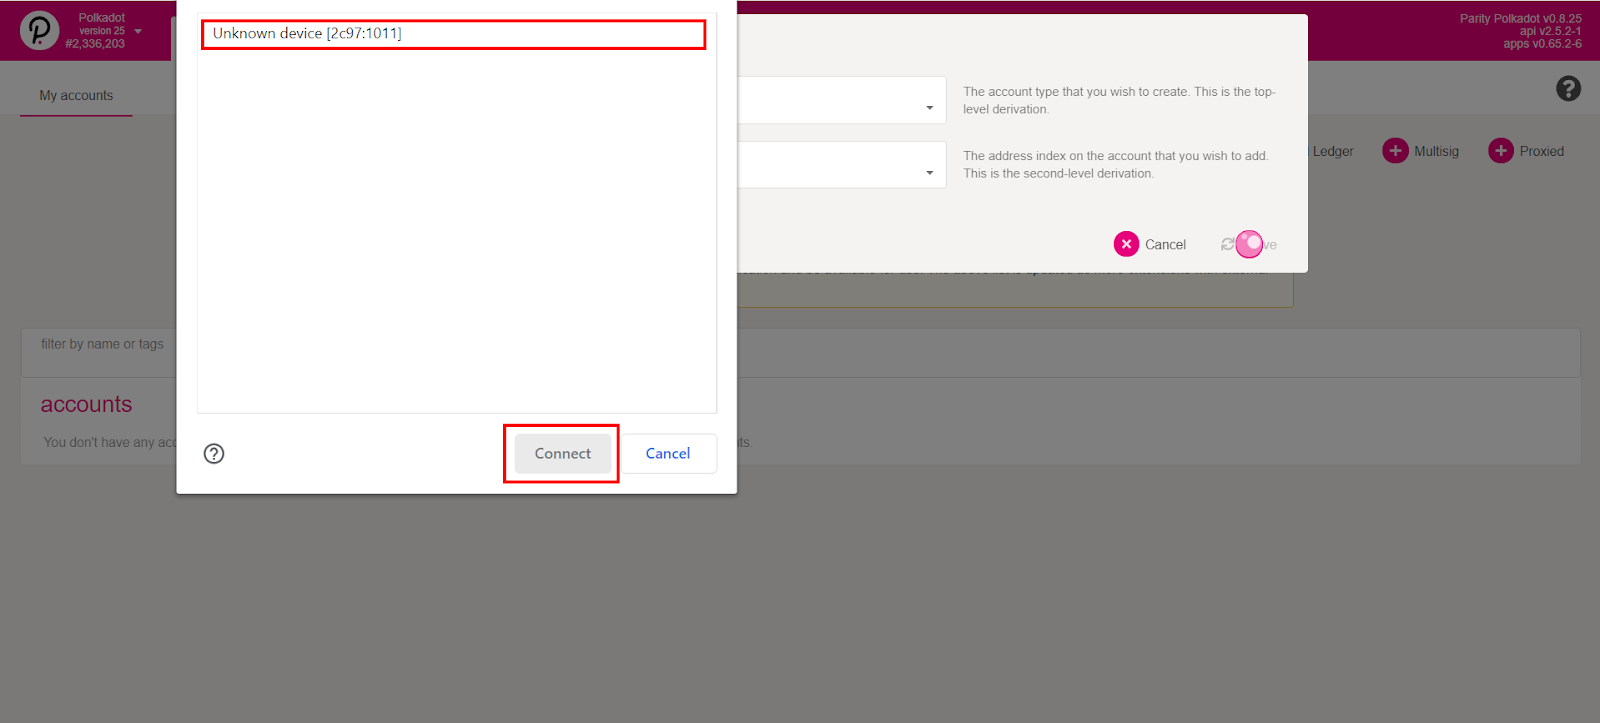
4. You will be asked to confirm the connection of your Ledger via web interface. Select it in a dialog window and press Connect.
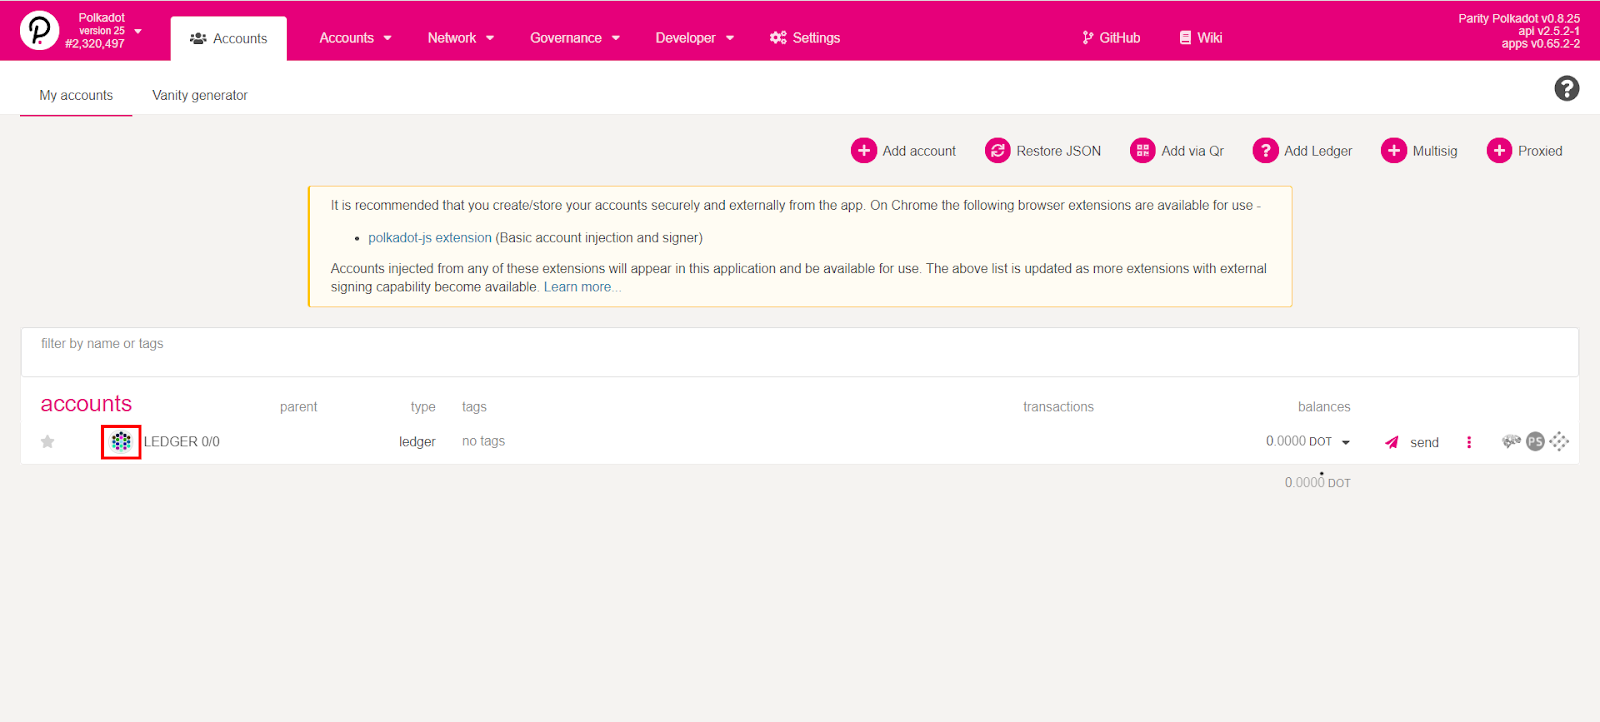
The account should appear on the screen. This account will play the role of your stash. If your stake is higher than 200k DOT - contact us to receive a special offer from P2P. To generate multiple addresses repeat steps 3,4 but every time choose a different address index in the drop-down menu of step 3.
We will continue with a single account but if there are multiple ones the following process should be repeated for each of them.
Left-click on the icon to copy the address and send DOT tokens to it.
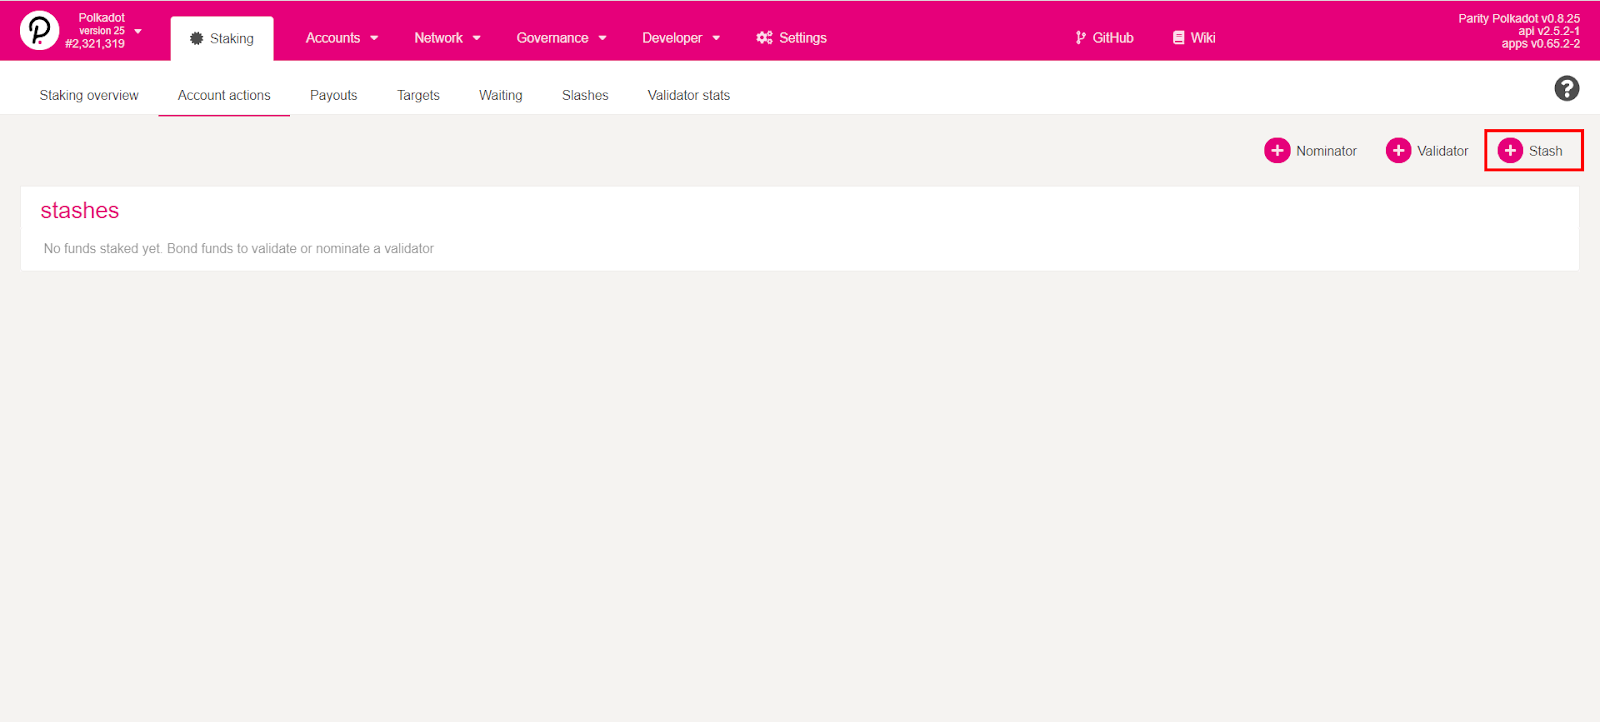
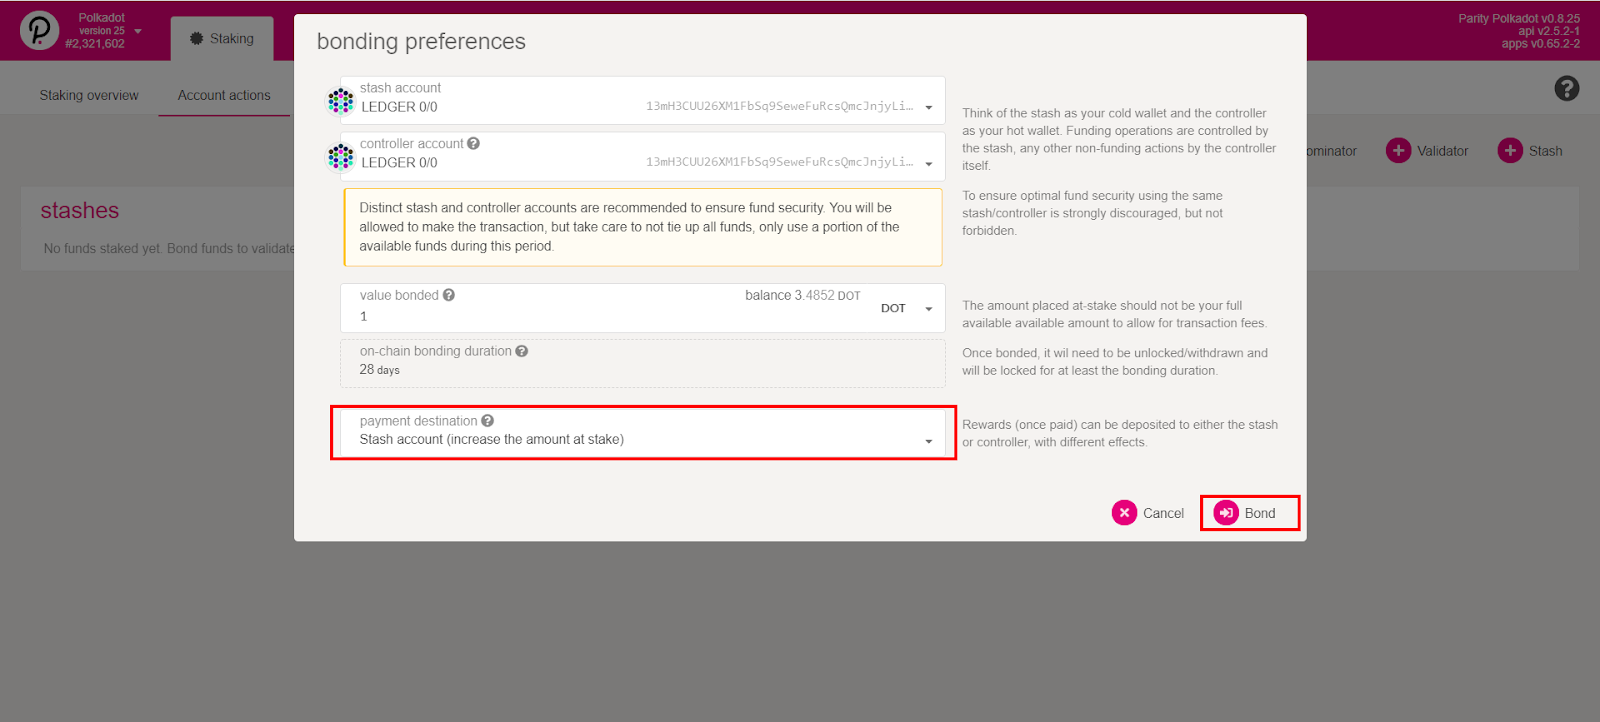
Bond the amount of DOT you wish to stake
Go to Network -> Staking and navigate to Account Actions by pressing the tab.
2. Bond the amount you wish to stake. Leave at least 2-3 DOT unbonded to cover future transaction fees. In the dropdown menu you can specify the desired way of receiving rewards. There are several options available: Staked (auto compound rewards); Stash (send rewards to the stash account); Controller (send rewards to the controller account); Account (send rewards to any 3rd party account).
We make payouts every day or three so you won’t need to pay a tx fee by yourself.
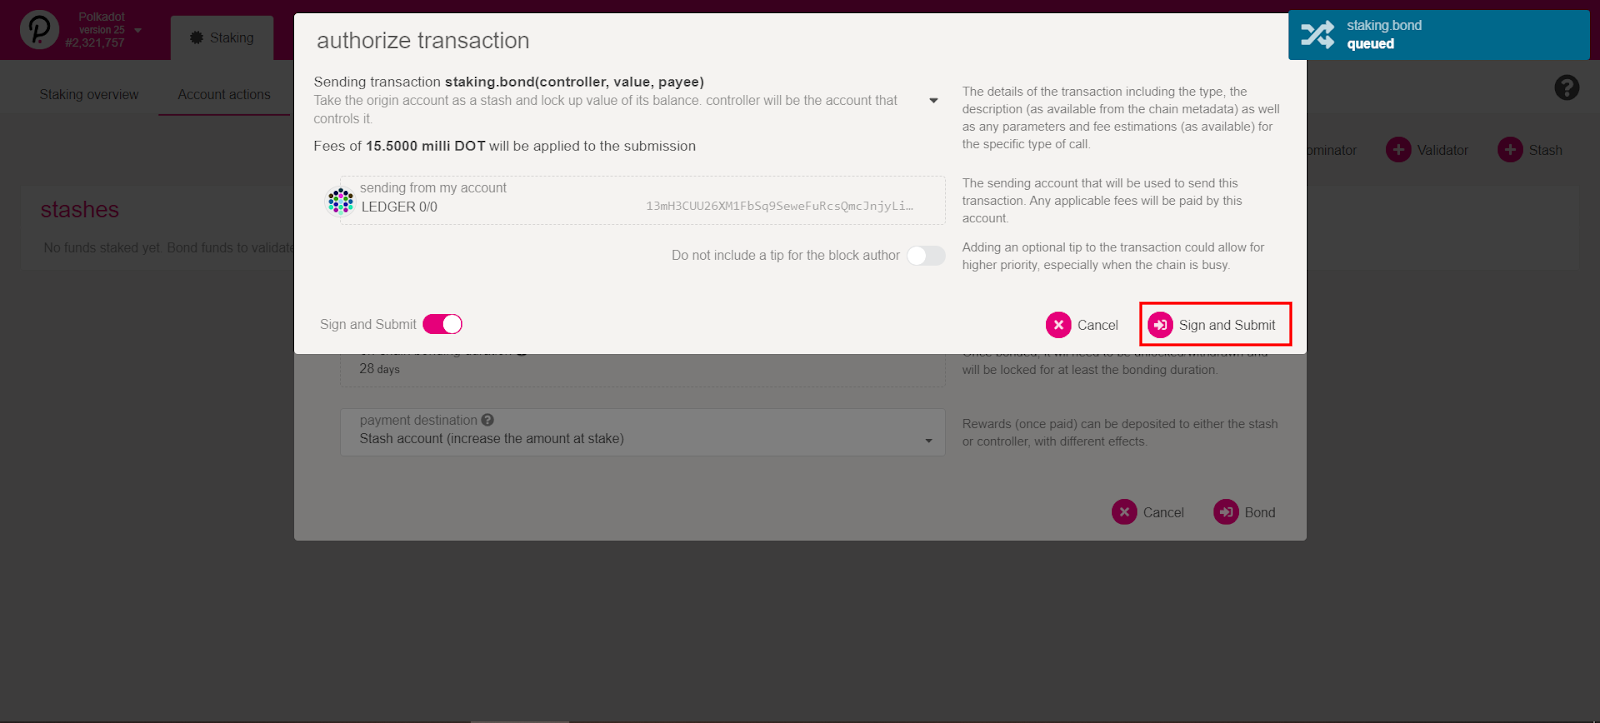
3. Press Sign and Submit, then confirm the transaction on your Ledger device
If the hardware wallet becomes disconnected, re-enter the Polkadot application and continue making actions on the PolkadotJS screen. You will be asked to connect Ledger via web interface as in step 5, after that continue with the step where the connection was lost.
4. After successful bonding your stash appears in the Account Actions tab. We recommend assigning a proxy account. It is a separate account that you should fund with 2-3 DOT and connect with your primary one to perform staking related operations on behalf of your stash, like triggering payout or nominating a validator. A staking proxy has no access to the funds on the stash account.
Nominate validators
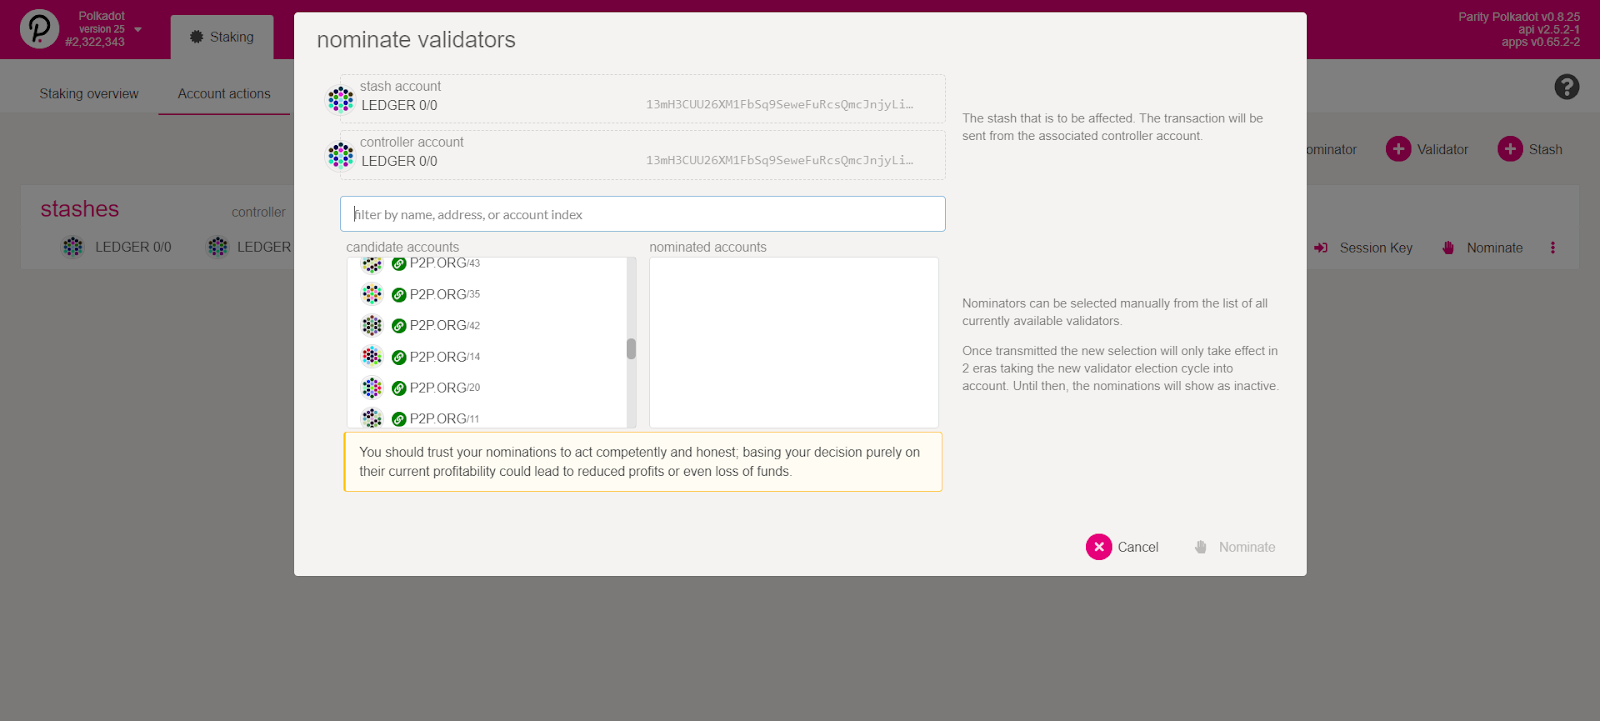
Press Nominate button
2. In the opened window select up to 16 validators you wish to stake with. If you would like to nominate P2P.org go to https://p2p.org/polkadot and select validators from there. We update the list on a regular basis.
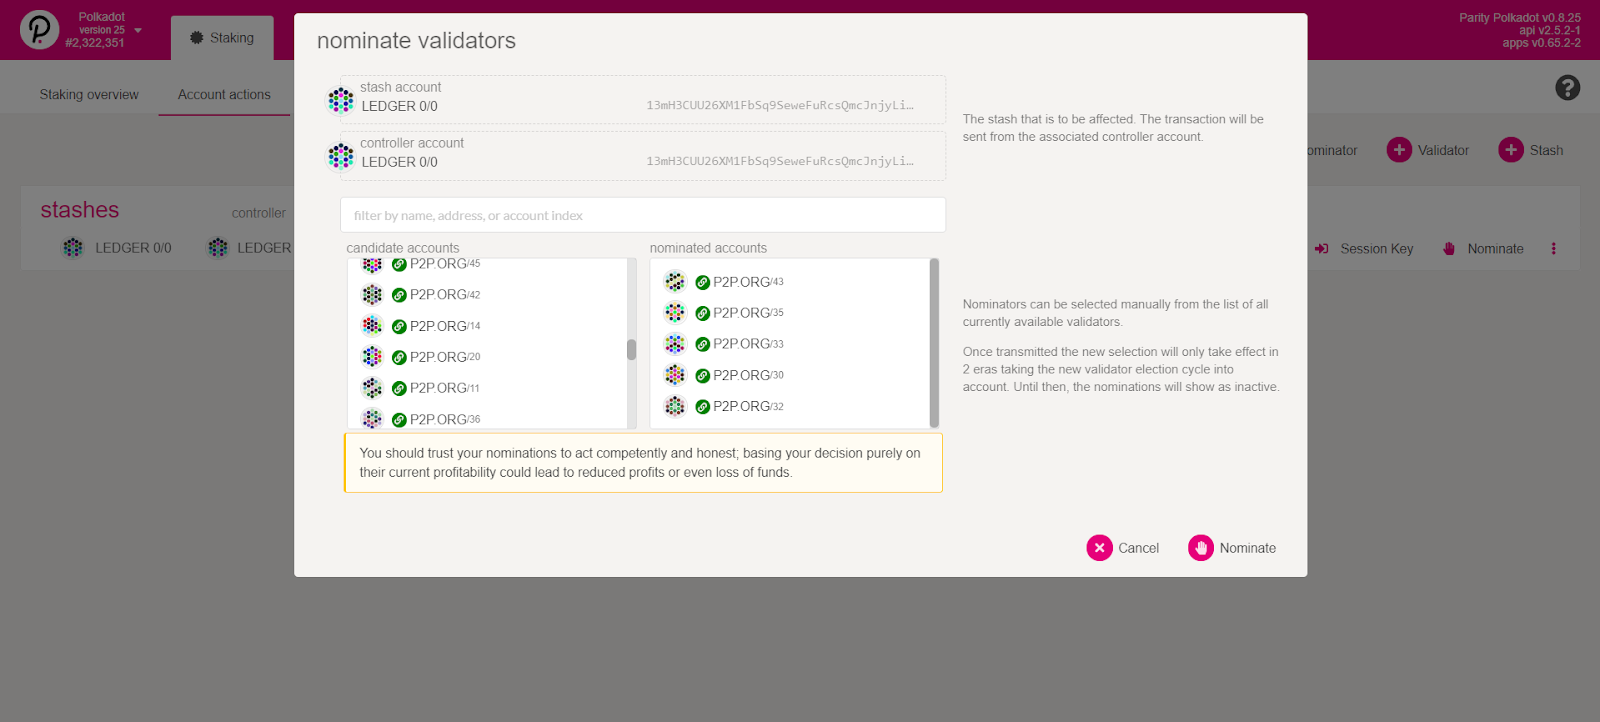
3. Chosen validators will appear in the right column. Press Nominate.
4. You may perform staking actions from both stash and proxy accounts. We recommend to use your proxy account for staking actions.
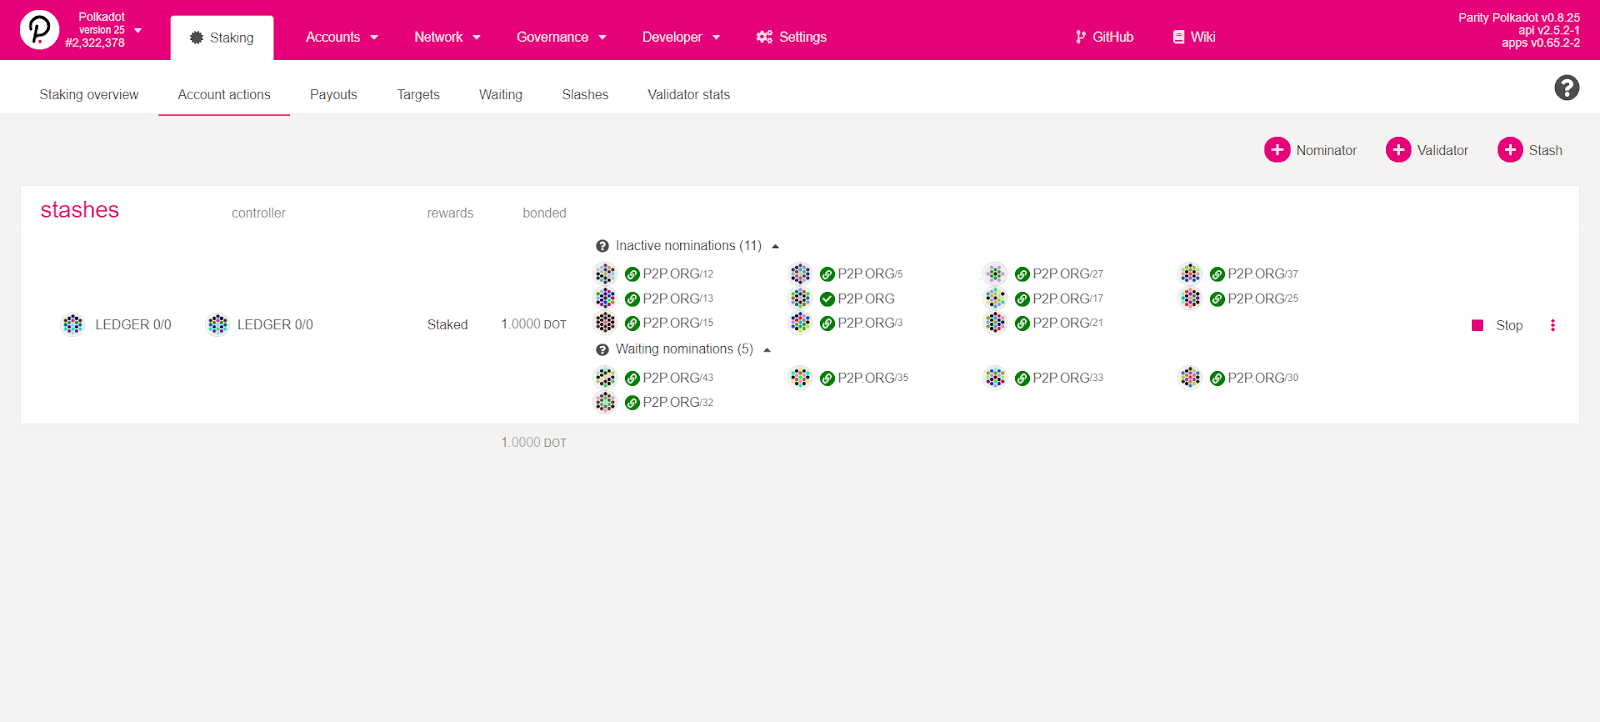
5. In the top right corner you should see that transaction is confirmed. Your screen should be updated and current nominations should appear in the Account Actions tab. From here you will be able to manage your staking in future.
Staking will begin from the next era or two (24 - 48 hours). You will be able to track nominations from Staking -> Account Actions. At least one nomination should become active thus your stake is working in full and generating rewards.
P2P.org is a world-leading non-custodial staking provider securing more than $3 billion by over 10,000 delegators/nominators across 25+ high-class networks. We have been presented in all Polkadot testnets and have been actively participating on Kusama network since the beginning. P2P.org invested its own funds in Polkadot in 2017 and intends to support the network in the long term.
Do not hesitate to ask questions in our Telegram chat or contact Alex via [email protected]. We are always open to communication.
<p>The Marlin network has announced the launch of FlowMint Stakedrop - a distribution method for the networks native POND tokens amongst delegators staking DOT, ATOM, NEAR and IRIS. </p><p>All delegators staking these tokens with P2P Validator will be able to participate in the Marlin FlowMint Stakedrop to earn extra POND tokens.</p><figure class="kg-card kg-image-card"><img src="https://p2p.org/economy/content/images/2020/12/02--1-.png" class="kg-image" alt loading="lazy" width="1280" height="720" srcset="https://p2p.org/economy/content/images/size/w600/2020/12/02--1-.png 600w, https://p2p.org/economy/content/images/size/w1000/2020/12/02--1-.png 1000w, https://p2p.org/economy/content/images/2020/12/02--1-.png 1280w" sizes="(min-width: 720px) 720px"></figure><p>It is expected that 20% of Marlin's POND tokens will be distributed daily pro-rata amongst participants who are currently staking their digital assets.</p><h3 id="the-marlin-network">The Marlin Network</h3><p>Marlin is a layer-0 protocol focused on network-layer performance, security and robustness. It speeds up block propagation of existing blockchains to enable higher throughput. Marlin nodes compete with one another to transmit blocks from producers to receivers of various blockchains. The Marlin protocol bridges the gap between the performance and scale achieved by web2 and the security and decentralization demanded by web3.</p><p>Marlin Protocol has reeled in a $3 million seed round from Binance Labs, Arrington XRP, Electric Capital, NGC and other investors.</p><h3 id="how-to-get-pond-tokens">How To Get POND Tokens</h3><p>To receive the tokens, P2P delegators will have to link their staking address in Polkadot, Cosmos, Near Protocol, Irisnet, and the ETH address where the POND tokens will be transferred after confirmation of operations.</p><p>Detailed instructions can be found below:</p><ul><li><a href="https://www.marlin.pro/blog/participating-in-marlin-flowmint-as-a-polkadot-delegator-and-validator/?ref=p2p.org">Participating in Marlin FlowMint as a Polkadot delegator</a></li><li><a href="https://www.marlin.pro/blog/participating-in-marlin-flowmint-as-a-cosmos-delegator-and-validator/?ref=p2p.org">Participating in Marlin FlowMint as a Cosmos delegator</a></li><li><a href="https://www.marlin.pro/blog/participating-in-marlin-flowmint-as-a-near-delegator-and-validator/?ref=p2p.org">Participating in Marlin FlowMint as a Near Protocol delegator</a></li><li><a href="https://www.marlin.pro/blog/participating-in-marlin-flowmint-as-an-irisnet-delegator-and-validator/?ref=p2p.org">Participating in Marlin FlowMint as a Irisnet delegator</a></li></ul><p>Tokens will be distributed on the Matic sidechain<strong> </strong>due to the gas-intensiveness of the smart contracts. You'll have to transfer the tokens to Ethereum Mainnet to be able to interact with Marlin contracts.</p><h3 id="delegator-registration">Delegator Registration</h3><p>P2P delegators in Polkadot, Cosmos, Near Protocol and Irisnet are getting a unique opportunity to participate in the Marlin network and get POND tokens. Our team has launched Marlin gateway nodes and all of the validator addresses have been added to the whitelists for FlowMint stakedrop.</p><p>Registration for ATOM, DOT and IRIS stakers <strong>will begin on December 15, 2020.</strong></p><p>Additional information:</p><ul><li>MPOND needs to be claimed separately for each chain.</li><li>If you delegate two different addresses for the same chain you need to register for stakedrop twice and use two different ETH addresses.</li><li>The same ETH address can be used for bonding in different chains.</li></ul><h3 id="pond-distribution">POND Distribution</h3><p>Marlin will begin with Polkadot, Cosmos, Irisnet, Near and Matic. That is, 0.027/5% tokens will be dedicated towards eligible delegators of ATOM, DOT, IRIS, MATIC and NEAR distributed daily pro-rata amongst each community based on the size of stake/delegation.</p><p>Eventually FlowMint will support Tezos and other networks, allocating a portion of genesis tokens to eligible delegators of the given networks to be distributed pro-rata each day based on the size of the stake or delegation. </p><p>We will inform you about the addition of new networks on our <a href="https://twitter.com/P2Pvalidator?ref=p2p.org">Twitter </a>and <a href="https://t.me/P2Pstaking?ref=p2p.org">Telegram</a> channels.</p><h3 id="about-p2p">About P2P</h3><p>P2P Validator is a world-leading staking provider with the best industry security practices and proven expertise. The service provides comprehensive due-diligence of digital assets and offers only top-notch staking opportunities. At the time of the latest update, more than 3 billion of USD value is staked with <a href="https://p2p.org/?utm_source=blog&utm_campaign=marlin_stakedrop">P2P Validator</a> by over 10,000 delegators across 25+ networks.</p><p>We are constantly working on improvements to bring our customers the best proposals. Participating and supporting new blockchains and protocols brings benefits to all our stakers.</p><hr><p><em>Interested in earning<em> POND<em><em>? Contact</em></em></em></em> <em><em>p.pavlov<em><em>@p2p.org</em></em></em></em> <em>for<em><em><em> personal assistance.</em></em></em></em></p><hr><p><strong><strong><strong><strong>Web:</strong></strong></strong> </strong><a href="https://p2p.org/?utm_source=blog&utm_campaign=marlin_stakedrop">p2p.org</a></p><p><strong><strong><strong><strong>Twitter:</strong></strong></strong> </strong><a href="https://twitter.com/p2pvalidator?ref=p2p.org">@p2pvalidator</a></p><p><strong><strong><strong><strong>Telegram:</strong></strong></strong> </strong><a href="https://t.me/P2Pstaking?ref=p2p.org">t.me/p2pvalidator</a></p>
<p>NuCypher is a decentralized secret management network where a group of nodes (workers) perform proxy re-encryption to manage permissions on encrypted data instead of a centralized server. It allows safe data exchange without ability for proxies to learn the plain text info. Correctness of worker behavior is guaranteed by staking and cryptographic proofs. Additional token emission incentivizes node operators to maintain high availability infrastructure and in the case of network rules violation a portion of their holdings will be slashed.</p><h3 id="current-state-and-market-potential"><strong>Current state and market potential</strong></h3><p>NuCypher mainnet successfully launched on 15th October 2020 allowing token holders to stake their NU.</p><p>Privacy of sensitive data is a vexed problem and services provided by NuCypher project are attractive and valuable not only in crypto space. The highest growth of<a href="https://www.statista.com/statistics/798564/number-of-us-residents-affected-by-data-breaches/?ref=p2p.org"> data breaches in USA</a> was in the healthcare sector demonstrating 80% increase from 2017 to 2019 including the transmission of confidential data without proper encryption.</p><p>Enterprises also are seeking ways to avoid data leaks and securely manage and share sensitive data.<a href="https://www.marketresearchfuture.com/reports/key-management-service-market-8188?ref=p2p.org"> The Global Key Management as a Service Market</a> market size is expected to grow from $363 million in 2018 to $1,28 billion by 2023 and is estimated to reach $2,29 billion by 2025 during the period 2019–2025.</p><h3 id="token-allocation"><strong>Token allocation</strong></h3><p>NuCypher raised $750k in 2016 ; $4.3 million in 2017 and $10,7 million in 2018. The overall token allocation showed in a diagram below.</p><figure class="kg-card kg-image-card"><img src="https://p2p.org/economy/content/images/2020/10/image-2.png" class="kg-image" alt loading="lazy" width="1600" height="897" srcset="https://p2p.org/economy/content/images/size/w600/2020/10/image-2.png 600w, https://p2p.org/economy/content/images/size/w1000/2020/10/image-2.png 1000w, https://p2p.org/economy/content/images/2020/10/image-2.png 1600w" sizes="(min-width: 720px) 720px"></figure><h3 id="staking-economics"><strong>Staking economics</strong></h3><p>In order to participate in the network as a worker and perform re-encryption, node operators have to lock NU tokens. At the start rewards from providing re-encryptions might be low so until the project gets traction, node operators will be incentivized mostly by emission of new tokens. <strong>Holders can delegate their funds and earn a share of rewards in proportion to their stake.</strong></p><p><strong>Compensation is higher when tokens are locked for a longer period.</strong> To get maximum compensation stakers have to lock their funds for at least a year to be allowed to accept policies with longer terms. Shorter commitment will result in lower rewards for participants and they will not be allowed to provide re-encryption if the length of a particular policy is higher than chosen lock-up period. <strong>Staking since the beginning of mainnet with compounding of rewards also will result in higher returns.</strong> The whole stake can be split into sub-stakes where each will have its own lock-up period.</p><p>In existing representation only one staker can delegate to a worker in near future, staker can be a smart contract that accepts delegations from various addresses. We believe in future adoption of NuCypher and will provide the long term staking maximizing staking rewards.</p><figure class="kg-card kg-image-card"><img src="https://p2p.org/economy/content/images/2020/10/table-14.png" class="kg-image" alt loading="lazy" width="1368" height="668" srcset="https://p2p.org/economy/content/images/size/w600/2020/10/table-14.png 600w, https://p2p.org/economy/content/images/size/w1000/2020/10/table-14.png 1000w, https://p2p.org/economy/content/images/2020/10/table-14.png 1368w" sizes="(min-width: 720px) 720px"></figure><h3 id="native-token"><strong>Native token</strong></h3><p>NuCypher token NU is ERC20 token the main purpose of which is to act as a staking token in the network with limited liquidity and low volatility. Amount of provided re-encryptions will be proportional to stake which is guaranteed to be locked at the end time of the policy. Node operators with higher stake presuming higher loss in case of bad behavior and ability to accept policies with longer terms.</p><p>NuCypher based on Ethereum blockchain means that users should have ETH on the worker node’s address to pay tx fees. Workers also share service fees paid by end users in ETH for providing re-encryptions.</p><p>Over 350 000 ETH were locked in the smart contract by participants to take part in<a href="https://blog.nucypher.com/the-worklock/?ref=p2p.org"> WorkLock token distribution model</a> proposed by NuCypher team.</p><h3 id="slashing-risks"><strong>Slashing risks</strong></h3><p>There are two potential slashing conditions:</p><ul><li>Providing incorrect responses</li><li>Continuous downtime</li></ul><p>At network genesis, the protocol will be able to detect and attribute instances of incorrect re-encryptions. If there are many sub-stakes and misbehavior occurs, unlocked tokens which do not participate in staking will be slashed in the first place and then ascending sub-stakes with lower lock-ups.</p><p>A false re-encryption is not like a double-sign. Correctness of a re-encryption can be proved via a zero-knowledge proof. If users receive incorrect re-encryption, they can provide this proof to the network, which will result in the node getting slashed. <strong>For each violation, 2×10⁻¹⁸ NU tokens will be deleted from the offender’s stake</strong>. <br><br>In the future, slashing parameters can be changed by the Decentralized Autonomous Organization (DAO) that is managed by NU stakeholders who operate nodes. It makes NuCypher a community driven project from the very beginning.</p><p>At network launch slashing for worker unavailability is turned off until it will be enabled by the DAO if needed. <strong>Stakers will not receive inflation rewards for any period the node is offline</strong>. A worker that doesn't timely apply updates and constantly experiencing downtime will also miss rewards.</p><h3 id="about-p2p-validator">About P2P Validator</h3><p><a href="https://p2p.org/?ref=p2p.org">P2P Validator</a> is a world-leading non-custodial staking provider securing more than $3 billion by over 10,000 delegators across 25+ high-class networks. Our team has close connections with NuCypher and we have participated in the incentivized testnet since the beginning. P2P Validator invested its own funds in NuCypher project in 2017 and intends to support the network in the long term.</p><h3 id="useful-nucypher-resources"><strong>Useful NuCypher resources</strong></h3><ul><li>Website:<a href="https://www.nucypher.com/?ref=p2p.org"> https://www.nucypher.com/</a></li><li>Github:<a href="https://github.com/nucypher/?ref=p2p.org"> https://github.com/nucypher/</a></li><li>Docs:<a href="https://docs.nucypher.com/en/latest/?ref=p2p.org"> https://docs.nucypher.com/en/latest/</a></li><li>Whitepaper Technical:<a href="https://github.com/nucypher/whitepaper/blob/master/whitepaper.pdf?ref=p2p.org"> https://github.com/nucypher/whitepaper/blob/master/whitepaper.pdf</a></li><li>Blog:<a href="https://blog.nucypher.com/?ref=p2p.org"> https://blog.nucypher.com/</a></li></ul><hr><p><em>Want to stake NU with us? Alexey will be happy to help. Contact [email protected] to get personal assistance.</em></p><hr><ul><li><strong>Stake NU with us:</strong> <a href="https://p2p.org/nucypher?ref=p2p.org">https://p2p.org/nucypher</a></li><li><strong>Web:</strong><a href="https://p2p.org/?ref=p2p.org"> https://p2p.org</a></li><li><strong>Twitter:</strong><a href="https://twitter.com/p2pvalidator?ref=p2p.org"> @p2pvalidator</a></li><li><strong>Telegram:</strong><a href="https://t.me/p2pvalidator?ref=p2p.org"> https://t.me/p2pvalidator</a></li></ul>
 ALL
Agoric
Aptos
Auth
Avail
Avalanche
Axelar
Babylon
Bitcoin
BTC
capital flow
Cardano
Celestia
certifications
Chainlink
compliance
Cosmos
Crescent
curator
Cyberway
DAOBet
Data stream
DeFi
defi dispatch
defi infrastrcuture
defi infrastructure
defi news
defi vault
due diligence
DVT
Dymension
Economy
Education
EigenLayer
Elrond
employee
employee advocacy
employee interviews
Ethereum
Evmos
exit queue
Explain Like I'm Five
Governance
Guide
hedge fund
how to
HR
HUB series
Hyperliquid
infrastructure
institutional lens
Kava
Kusama
landing
legal layer
Lido
liquid staking
LSP
Manta
Mantle
Marlin
Matic
MiCA
Moonbeam
MultiversX
Near
Networks
News
NuCypher
Oasis
Obol
Origin
P2P Verified
Partnership
pectra
Persistence
playbook
Pocket
Polkadot
Polygon
product
products
Quicksilver
Regen
regulation
Renzo
restaking
RPC Node
Sender
Serum
slashing
Solana
SSV
SSV.Network
ALL
Agoric
Aptos
Auth
Avail
Avalanche
Axelar
Babylon
Bitcoin
BTC
capital flow
Cardano
Celestia
certifications
Chainlink
compliance
Cosmos
Crescent
curator
Cyberway
DAOBet
Data stream
DeFi
defi dispatch
defi infrastrcuture
defi infrastructure
defi news
defi vault
due diligence
DVT
Dymension
Economy
Education
EigenLayer
Elrond
employee
employee advocacy
employee interviews
Ethereum
Evmos
exit queue
Explain Like I'm Five
Governance
Guide
hedge fund
how to
HR
HUB series
Hyperliquid
infrastructure
institutional lens
Kava
Kusama
landing
legal layer
Lido
liquid staking
LSP
Manta
Mantle
Marlin
Matic
MiCA
Moonbeam
MultiversX
Near
Networks
News
NuCypher
Oasis
Obol
Origin
P2P Verified
Partnership
pectra
Persistence
playbook
Pocket
Polkadot
Polygon
product
products
Quicksilver
Regen
regulation
Renzo
restaking
RPC Node
Sender
Serum
slashing
Solana
SSV
SSV.Network